Wednesday, June 15, 2011

A Thank You

Materials:
Design Paper - K & Company Susan Winget Spring Blossom
Solid Green Paper and Kraft Paper
Rubber Stamp - Lili of the Valley - Born to Shop
Clear Thank You sentiment
Spellbinders Nestabilities - Labels 12
Flower - Yellow felt created by me using button and twine
Brown Bakers Twine - My Craft Spot
Markers - Copic Sketch
White Gelly Role Pen - Sakura
  Hi ya everyone!
  Just a quick little card I created using an adorable stamp from a friend!!  I love this cute little bear from Lili of the Valley and had so much fun coloring her.  I used my Copics of course and topped her off with some white accents.  I also added a bit of colorless blending solution to the inside of a CLEAN old sock and gently touched down on the bears fur for a fluffy appearance.
I used my labels 12 nestables and cut her and an accent in green.  I then layered on this gorgeous paper from K& Co.  Wrapped a bit of twine around and added a little tag with the sentiment.  I also created this little yellow flower from some felt I have in my stash.
I hope my friend likes her thank you card!!!  
 Care about my Copics?
Challenges: Make My Monday - Die Cut Flowers

Tuesday, June 14, 2011

Awww, Thanks! - Tiddly Inks Challenge

 Hi ya everyone!
  Don't ya just love simplifying life?  I like to make things simple so I can concentrate on family time and crafting - so when Christy asked us to simplify this week on the Tiddly Inks Challenge Blog and make a single layered card - I thought hmmmm...interesting and difficult!!!!!  How am I going to use all my gorgeous design papers????  Well I figured I'd start in PowerPoint and Create my whole card.
 I made borders and placed this cutey called Awww Thanks right in the middle!  I computer generated the sentiment as well and printed it all out on my laser printer.  I colored her first and then colored in portions of the border.
 I stamped the bit of scrolling above her and colored that as well.  Last but not least I went around with my gel pen and added little dots to her clothes and portions of the purple border and I was done!!!  I let my Copics do most of the work and I like the way it turned out.
 Christy has a great demonstration of printing out some cards from Tiddly Inks too - so make sure to check that out!   
Head over to the Tiddly Inks store and stock up on a few Tiddly's then head over to the challenge blog and give our one layer card a try!!!
Care about my Copics???


Monday, June 13, 2011

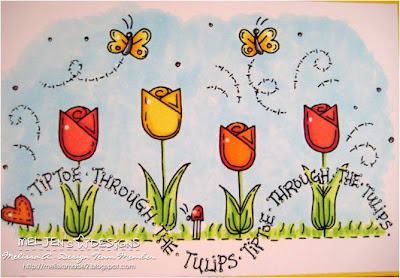
Tip Toe Through the Tulips - Meljen's Designs

 Hi ya everyone!
  Just a sweet and simple card this week.  As you know I love Meljen's Designs images and you can find all of them right HERE at Whimsy Stamps.  They are so sweet and it's easy to create a simple card with them.  I colored the image Tip Toe Through The Tulips in my Copics.
I highlighted a few areas with my white gel pen.  Mounted them on yellow and on red and added bakers twine and a little button.  Very quick and I love how it turned out!
Thanks for stopping by today!

Friday, June 10, 2011

Yummmm Cookies Layout Created for Another

Hi Ya Everyone!
  Something a little different today.  My lovely friend Sheila from She's A Sassy Lady went to the Dallas Stampede with me.  Sheila and Pam of The Bug Bytes came up with some table games - one of which was to draw names and each person create a layout for another person using personal photos.  The layout was to be put together partially and then the person to whom the layout was created was to finish putting it together.  Well Elizabeth of 217 Creations drew Sheila's name and then almost canceled the trip do to family matters so in the mean time I decided to prepare a layout just in case. Well the good news came and Elizabeth was able to come after all and did a wonderful page of Sheila's grand sons Justin and Gavin making cookies, but I had already prepared this layout. So when it came time to leave I gifted Sheila with these two pages and she finally had the opportunity to put them together.
This is Sheila's post - she also made a great video as she was putting the layout together - if you would like to see the video please stop by her blog HERE at She's A Sassy Lady.
Take it away Sheila!!!
You will love the ease that this layout went together and the detail that Melissa put into it.
Look closely at the letters and you can see she used a white gel pen on each one of them that offered a finished look to the design. She cut these words From My Kitchen.
Look at the letters on this page. They are from Nursery Rhymes and Melissa used the shadow feature and then her white gel pen to turn out AWESOME letters.
Just look at the detail to this Gingerbread man. It looks just like frosting along the edges! And look at the little bow tie around it's neck with the little buttons to finish off the look! Love it!
And look at my embellishments... these great buttons and look at the little cookie cutters they look so real and would you believe it wasn't until I was gluing on the second one that I realized they were actually plastic and not metal! They look that real!
Here is a close up of one of the pages.
And the other.... Don't you just love the look. And if you want a closer look just click on the photo for an enlargement.
I sure hope you enjoyed today's post. I know I sure enjoyed putting together a layout designed by Melissa featuring my grandson's Justin and Gavin. Thank you for your sweet sweet words of encouragement. Your comments continue to inspire me to keep sharing with you.
signature

Thursday, June 9, 2011

Dream - Meljen's Release

 Hi ya everyone!
  New release at Meljen's Design this week!  I LOVE this release...I like girly things because I have two sweet girls.  Growing up I was a tomboy but now - for whatever reason I'm turning into a person that loves pinks and pearls and that is the challenge at Meljen's Design Challenge blog.  I had to play even though it's my week to create anything!  I mean really -- look at this release found at Whimsy Stamps:
Also, I must add that I've been checking out Debbie Olson's site - Thinking Inking.  She is super amazing and her creations are inspiring.  I used her stitching technique with nestability cut-outs for this card.  Please check her blog out - I'm sure you will want to follow her. 
I started by coloring the adorable ballet slippers with my Copics.  I added a bit of sparkle with some Spica pen.  I used my nestable and cut out some pretty shapes in two different papers. 
 Added some paper from my DCWV stack for the main background and used my MS punch for a border.  I added some pearl accents and also colored a few pearls with my Copics.  I pulled out my sewing machine and added the stitching down one side.  I used my Copics to color my ribbon as well and added a tiny charm.
I also used my Perfect Medium with this Dream stamp and added some Perfect Pearls in a pretty pink shimmer.  Hop on over to the Meljen's Design Team blog and check out my teamies creations - they are gorgeous and the new release is so fun - join our challenge after picking up your own sweet Meljen stamp at Whimsy Stamps! 
Care about my Copics???
  -R000
  -R20
  -R22

Wednesday, June 8, 2011

Summer at the Beach - Some Odd Girl Sneaks!!

 Hi ya everyone,
  Well I'm bummed to say it - but today is my last day with the FABULOUS design team at the Some Odd Girl challenge blog.  Kristy was so nice to let me play along with them with the three facebook images I won!  I had so much fun coloring Kaylee, Octee and Tobie!  So thanks so much Kristy - you are awesome!  Please be sure to stop by the shop soon to see all of the new release and don't forget about all the adorable stamps from Some Odd Girl.
I colored Tobie in Copics and made a little beach scene for him!
I decided he needed a few freckles too - as a little redhead in the sun is sure to have a few!  I had a little beach clear sticker I used on the side and a fun little charm that was a pair of snorkeling goggles just like Tobies'.
Once he was colored I added glossy accents to his flippers, goggles and water wings.  I also added a bit of blue/turquoise ribbon and used some fun alpha beads for the summer sentiment...because really - what is better than the beach during the summer months!
Please head over to the Some Odd Girl Challenge blog and leave comments on the new release this week and you could win some of your very own images from Some Odd Girl!!!
Care about my Copics???

Tuesday, June 7, 2011

Who Can Resist a Smiling Octopus - Some Odd Girl Sneaks Week!!!

OH MY GOSH!!!! Isn't this octopus just the cutest of cutes???  I mean really...look at that smile!  I love him and loved coloring him even more - this is another adorable image from Some Odd Girl.  Colored him up in my Copics of course and added some white gel pen here and there.
I cut out sand dollars on my cricut and used my Copics to highlight them.  I also cuttlebugged my paper with a folder that looked a lot like octopus sucker cups!  That is the technical term too!
The sentiment is from Clean and Simple Stamps.  I used some twine from a clear stamp I got from Some Odd Girl too!!! I love reusing!!!
Care about my Copics??

Dark Love - Going Goth at Tiddly Inks!!!

 Hi ya everyone!
  This month at the Tiddly Inks Challenge Blog we are celebrating our differences or just differences in general!!  So this week we are going Goth!!!  I always say I'm not really all that dark - but I LOVE how this card turned out!!!  I chose this adorable image from Tiddly Inks called You and Me. I colored them in my Copics.
 I also used this cool grungy ink stain that Christy created for a freebie (you can find it on the challenge blog).  I created my paper with a $1 studio G stamp - the first is a forever stamp.  The second is a skull stamp I used this on the maroon background.  I also inked the edges in black ink.  I added a bit of black lace ribbon down the side and I added a Love charm.
 I also added a quick strip of black flowers from an EK punch.  I added a few pearls to top it off...don't they look great in Goth??   Join our challenge - OH and the fabby Christy has two NEW fabulous image - Awww Thanks and Lillie Lolita!!!
Care about my Copics?
Challenges entered:  Make It Colorful - Shadows and Shading

Monday, June 6, 2011

Finally Summer - Some Odd Girl New Release!!

Hi ya everyone!!!
  Ok, I'm super excited because Kristy is being so very sweet and allowing me to guest design at SOME ODD GIRL during their sneaks week on the Some Odd Girl Challenge Blog!!! WOOT!


I won three of the new images during a Facebook contest - Yes there is an SOG facebook page - right HERE!  Anyhow, as you know I love these stamps and when Kristy asked me I was on cloud 9!
Anyhow, the first release of the week is Beach Kalee - and she is just the sunniest diva around!  My favorite part of this stamp was coloring her sunglasses - LOL - I added in some eyes with my Copics and cut her out!
 I used some great beachy paper I had in my stash and used this "Love 2 Swim" piece I had as well.  I used my nestabilities to cut out the sun and inked the edges with a bit of orange Stampin' Up ink from their old Bold and Brights collection.
 I also added a bit of crinkle ribbon and some bling!  Really though, who cares about my card this adorable image will be available after sneaks week at Some Odd Girl - so go get her!!!
Care about my Copics??? Here are the colors I chose for this image - click for larger view!

Thursday, June 2, 2011

Live today - Meljen's Coastal Challenge

Hi ya everyone!  This week at Meljen's Challenge blog there is an adorable release with a beachy feel that's perfect for summer!  These adorable little images have just come out today at Whimsy Stamps!

I love the Beach Umbrella image - ah, it feels so relaxing - and colored it in Copics.
I kept this card really simple as I was crafting with a friend - which always distracts me!! I love to chat!  I used some paper I go a year or so ago from the CKC convention - sorry I have NO idea where it came from!  I used this paper to cut out the fish and add them to the top.  I also used a sentiment and flower clear stamp.
Head over to Whimsy pick up a few coastal images and join our challenge this week!

Wednesday, June 1, 2011

Explore - Make It Colourful Challenge

 Hi ya everyone!
  Decided to bust out my yellows and purples for the challenge at Make it Colourful.  I'm not a huge fan of these colors together so it WAS a challenge for me.  I decided to do something different again and colored this adorable Tiddly Ink Stamp Bathing Beauty in a vintage purple color V91, V93, V95 and V99. 
 I then colored the float in yellows Y32, Y35, Y38.  I colored her in shades of Cool Gray and her hair black.  I then took some Tim Holtz Inks (Black Soot and Dusty Concord) and distressed the whole image.  I set the image to the side to dry and grabbed my Tim Holtz paper stack. 
 I also used some Inkadinkadoo stamps and stamped the papers with same Dusty Concord ink.  I used some Antique Linen Tim Holtz distress ink and inked the black and white twine and added that as well. Finally, topped off the image with some bling!