Hi ya everyone! I'm going to share a very simple tutorial on what kind of images you can color cost effectively. Thank you to the lovely Pam for letting me share with you at The BugBytes today! I enjoy my Copic markers so much and think that they are truly the best marker for coloring large images such as the Tiddly Ink Alice image above. However, for smaller images like the tea cup a cheap pair of Crayola colored pencils will do. Check out my video below!
Thanks for watching and I love to hear your comments! For more fun projects don't forget to stop by The BugBytes!
Showing posts with label Colored Pencils. Show all posts
Tuesday, December 27, 2011
Coloring on the Cheap!
Labels:
Colored Pencils,
The BugBytes,
Tiddly Inks
Saturday, July 24, 2010
Trees - Tiddly Inks Challenge #14 Sketch it
Hey everyone,
The new challenge at Tiddly Inks for the week is to follow a sketch. I've been so excited to use this very cute Tiddly Inks stamp. I also wanted to use my new nestables from Spellbinders, so the sketch worked perfectly for using the circle cut. I used the largest circle and the next size down for the stamp and the outer green layer. Once I had colored the stamp with my colored pencils I printed another digital image on a piece of regular paper and trimmed it out carefully. I layed this over my colored image and took my Stampin' Up Creamy Caramel and sponged over the entire circle which left a nice creamy background with my stamp.
I set this aside cut a 4 3/4 x 4 3/4 piece of cream cardstock that I embossed with my cuttlebug folder birds and swirls on the right half of the cardstock. Next I inked in the same color the edge that was not embossed. I inked the circle the stamp is on and the green cardstock with the same color and layered those. Before adding the stamp I added a bit of burlap and some green hemp to my 5x5 card. Next I placed on my buttons and heart embellishment. I added a layer of these cute leaves from Prima Flowers and popped my stamped circle from the whole card.
I really enjoyed this earthy project. The sentiment was sort of different for me - I could not think of something that wasn't so obvious - so instead I just put a heart - because I do so love trees!!!
Enjoy!
Thursday, July 22, 2010
Tiddly Inks Blog Hop - Halloween in July!!!!
YAY!!! It's finally here! I've been waiting and waiting for this blog hop because Halloween in one of my favorite times of year! I love getting my kids dressed up and painting their faces!! Anyhow, Tiddly Inks is having a blog hop. You have to create a project/card using a Tiddly Inks digital image. I have to be honest I only knew about Tiddly Inks images because of Donna Mundinger. She got me hooked, so be sure to check her blog as well - she's extremely talented.
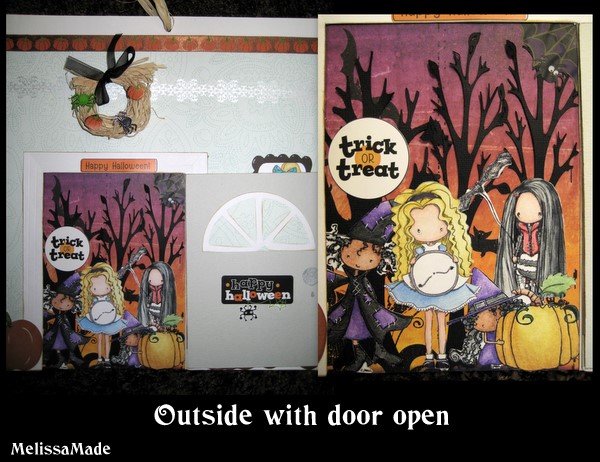
I had so much fun with this! I wanted to use as many of their cute images as I could - in all 5!!! You might be wondering how five! Well take a look at this wall hanging I did for my girls for Halloween. In the picture frame is cute little Annie - Annie's Prezzie
I used a number of cartridges and embellishments too! Stretch Your Imagination for the trees, keyhole is from Gypsy Wanderings, the table is from Celebrations - it's actually a cake plate, and the frame is from Mini Monograms. Oh, also the window on the front door is supposed to be a lemon slice from Just Because Cards. The bowl is from My Kitchen. Now you might ask yourself where the other images are??? Well the door bell is ringing - DING DONG
TRICK OR TREAT!!!!
The four images from left to right are Higgelty, Alice in Time for Tea, Bug - Peek A Boo Bugg and Batty. All images were colored with Prisma colored pencils and blended using baby oil. I started by making the inside of the house. The door was made on George with just squares and rectangles. I scored the door frame with my Martha Stewart score board. Once I had the door in place on my top layer, I cut out the doorway and then placed my Tiddly Ink characters in position on the paper behind. Once they were layered, I placed the inside on the top of the outside sheet and glued it down. Lastly, I embellished and made the tiny wreath over the door with rafia and some cute spider buttons. This project was so fun, and honestly it's part of why I haven't done anything else lately. It's been on my mind since the blog hop info. was mentioned!!! Make sure to head over to Tiddly Inks for the blog hop - the artistry from the people who are part of the hop will be amazing!!! I hope you enjoy - I did!!!
I had so much fun with this! I wanted to use as many of their cute images as I could - in all 5!!! You might be wondering how five! Well take a look at this wall hanging I did for my girls for Halloween. In the picture frame is cute little Annie - Annie's Prezzie
I used a number of cartridges and embellishments too! Stretch Your Imagination for the trees, keyhole is from Gypsy Wanderings, the table is from Celebrations - it's actually a cake plate, and the frame is from Mini Monograms. Oh, also the window on the front door is supposed to be a lemon slice from Just Because Cards. The bowl is from My Kitchen. Now you might ask yourself where the other images are??? Well the door bell is ringing - DING DONG
TRICK OR TREAT!!!!
The four images from left to right are Higgelty, Alice in Time for Tea, Bug - Peek A Boo Bugg and Batty. All images were colored with Prisma colored pencils and blended using baby oil. I started by making the inside of the house. The door was made on George with just squares and rectangles. I scored the door frame with my Martha Stewart score board. Once I had the door in place on my top layer, I cut out the doorway and then placed my Tiddly Ink characters in position on the paper behind. Once they were layered, I placed the inside on the top of the outside sheet and glued it down. Lastly, I embellished and made the tiny wreath over the door with rafia and some cute spider buttons. This project was so fun, and honestly it's part of why I haven't done anything else lately. It's been on my mind since the blog hop info. was mentioned!!! Make sure to head over to Tiddly Inks for the blog hop - the artistry from the people who are part of the hop will be amazing!!! I hope you enjoy - I did!!!
Subscribe to:
Posts (Atom)