Showing posts with label Four Legged Friends. Show all posts

Thursday, January 27, 2011

A Treat for Four Feet! - She's A Sassy Lady Tutorial


Hi ya everyone!
Today at She's A Sassy Lady I'm sharing how to make this little doggy treat jar!  Thanks Sheila for letting me share again today!  My hubby and I have friends that lost their old doggy and recently got a puppy!  He is ADORABLE - a black golden doodle - now have you ever heard of a BLACK golden doodle! LOL he is just the cutest so we decided to make Dexter a little gift.
 I started with a left over jam jar.  I removed the label and ran the jar through the dishwasher.  I measured the height of the jar and the diameter of the lid.  My jar is about a 4 inch high jar and the lid is about 2 inches across. I also took a sheet of paper and measured around the outside of the jar and it was close to 8 inches.  On my Gypsy I used the new Lite cartridge Four Legged Friends and placed paw prints randomly around the page.
Next, again with my Gypsy, I made a circle and it's shadow using George and Basic Shapes for the 2 inch lid.  I also added the sentiment from Four Legged Friends that says "Wet nose Warm heart".
 I cut a sheet of brown vinyl on my Imagine for the paw prints.
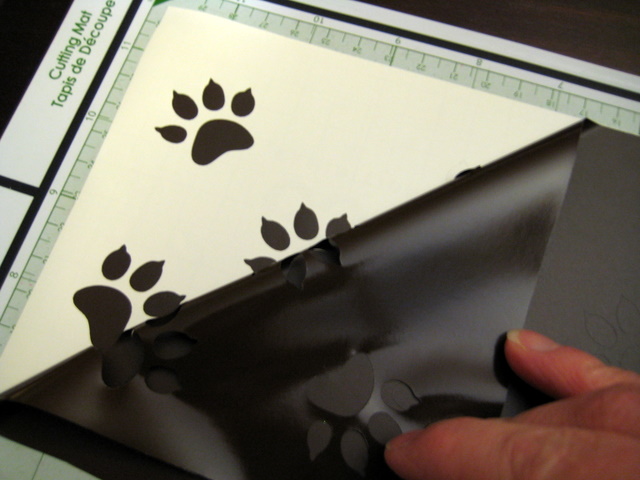
 After the prints were cut, I rubbed them down with a flat wood stick and took a sharp tool and peeled away the layer of vinyl I wasn't going to use.
 I just poke through the top layer and peel back at a sharp angle making sure that no prints came away with the excess.
 I used transfer tape and again using my wooden stick rubbed the paw prints so they would adhere to the transfer tape.
Next, I peeled back the tape at a sharp angle making sure the paw prints came with it.
 My hubby helped here by holding the jar as I wound the tape around the jar.
I  rubbed all the prints to the jar and slowly peeled back the transfer tape.
  I also added one little paw print to the inside of the jar lid.
 Next, I cut the circles and sentiment with the Imagine and adhered the circles together using my Xyron.
 I then glued the words to the sentiment.  I used my ATG gun and taped the round tag to the top of the lid.
 I used some beautiful crinkle ribbon and tied a little bow around the top of the jar.  Finally, I added some milk bones!
I hope that Dexter enjoys his treats and his little treat jar.
Thanks Sheila!  Head on over to She's A Sassy Lady for more fun and lots of tutorials!!
Hugs
Melissa

Tuesday, January 4, 2011

Happy Birthday - Robyn's DT call


Hi everyone!
 I thought it would be fun to join in the competition at My Pink Stamper this week!  I noticed a lot of friends and amazing bloggers are trying for a chance on the design team for Robyn.  Well, there are only two spots and over 150 entries!!!  I hardly think I will make the cut - but thought it would be fun to join along!  I love the colors she chose (her favorites) pink, green and brown.  Aren't those fun?  You also have to use your favorite Cricut cartridge and well let's just say I have too many favorites! LOL - but I did choose my new Lite - Four Legged Friends.  You need to also include a recipe for your card!

Consumables:
Green Basic Grey - Cappella
Designer Paper Basic Grey - Cappella
Light Pink Cricut Paper - Red and Pink Stack
Brown Paper (light and dark) - Bazzil Cardstock
White thread or white pen for stitching
Pink Ribbon
Tombo Glue
Foam Pop dots

Supplies:
Cricut Expressions
Gypsy
ATG gun or other adhesive runner
Sewing Machine (optional)
Happy Birthday Sentiment

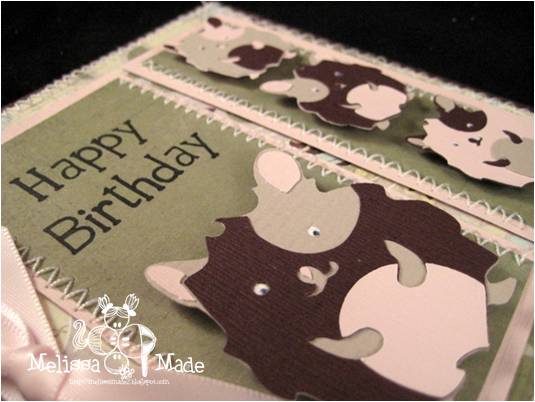
I designed the card on my Gypsy and cut everything out for a 5x5 card base.  The stitching was done on three sections of the card.  I chose the hamster cut and cut them at about 1.3 inches for the small and 2.3 for the larger hamster.  I layered each piece and then attached each section with my ATG (1/4 inch tape).  Lastly, I popped out each hamster!  Thanks for looking and join the fun at My Pink Stamper!!