Hi ya everyone!
Sheila at She's A Sassy Lady does a weekly Gypsy Made Simple tutorial where she teaches all kinds of wonderful things on how to use that Fabulous Little Lady we call the Gypsy! She is asking that everyone simply attach a project made with the Gypsy to the linky right HERE. This will help others who are beginning to use the Gypsy not only learn but also become inspired by what it can do. Sadly, I lost a very close friend last week and that was my Expressions!!! She is not doing to well - my mat is NOT feeding properly. Alas, no worries as I do have an Imagine and I'm learning so much. I used Doodlecharms (watermelon cut), Straight From the Nest (summer cut) and Best Friends (paper patterns). I designed this on my Gypsy first using the Imagine application! Hop on over to She's A Sassy Lady and see what everyone has been up to!
Showing posts with label Doodlecharms. Show all posts
Wednesday, July 13, 2011
Thursday, July 22, 2010
Tiddly Inks Blog Hop - Halloween in July!!!!
YAY!!! It's finally here! I've been waiting and waiting for this blog hop because Halloween in one of my favorite times of year! I love getting my kids dressed up and painting their faces!! Anyhow, Tiddly Inks is having a blog hop. You have to create a project/card using a Tiddly Inks digital image. I have to be honest I only knew about Tiddly Inks images because of Donna Mundinger. She got me hooked, so be sure to check her blog as well - she's extremely talented.
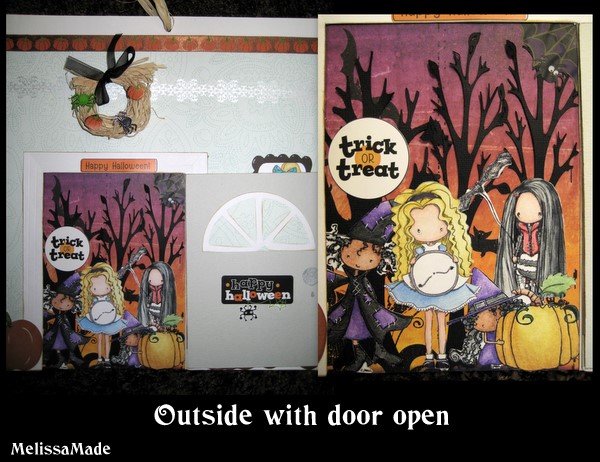
I had so much fun with this! I wanted to use as many of their cute images as I could - in all 5!!! You might be wondering how five! Well take a look at this wall hanging I did for my girls for Halloween. In the picture frame is cute little Annie - Annie's Prezzie
I used a number of cartridges and embellishments too! Stretch Your Imagination for the trees, keyhole is from Gypsy Wanderings, the table is from Celebrations - it's actually a cake plate, and the frame is from Mini Monograms. Oh, also the window on the front door is supposed to be a lemon slice from Just Because Cards. The bowl is from My Kitchen. Now you might ask yourself where the other images are??? Well the door bell is ringing - DING DONG
TRICK OR TREAT!!!!
The four images from left to right are Higgelty, Alice in Time for Tea, Bug - Peek A Boo Bugg and Batty. All images were colored with Prisma colored pencils and blended using baby oil. I started by making the inside of the house. The door was made on George with just squares and rectangles. I scored the door frame with my Martha Stewart score board. Once I had the door in place on my top layer, I cut out the doorway and then placed my Tiddly Ink characters in position on the paper behind. Once they were layered, I placed the inside on the top of the outside sheet and glued it down. Lastly, I embellished and made the tiny wreath over the door with rafia and some cute spider buttons. This project was so fun, and honestly it's part of why I haven't done anything else lately. It's been on my mind since the blog hop info. was mentioned!!! Make sure to head over to Tiddly Inks for the blog hop - the artistry from the people who are part of the hop will be amazing!!! I hope you enjoy - I did!!!
I had so much fun with this! I wanted to use as many of their cute images as I could - in all 5!!! You might be wondering how five! Well take a look at this wall hanging I did for my girls for Halloween. In the picture frame is cute little Annie - Annie's Prezzie
I used a number of cartridges and embellishments too! Stretch Your Imagination for the trees, keyhole is from Gypsy Wanderings, the table is from Celebrations - it's actually a cake plate, and the frame is from Mini Monograms. Oh, also the window on the front door is supposed to be a lemon slice from Just Because Cards. The bowl is from My Kitchen. Now you might ask yourself where the other images are??? Well the door bell is ringing - DING DONG
TRICK OR TREAT!!!!
The four images from left to right are Higgelty, Alice in Time for Tea, Bug - Peek A Boo Bugg and Batty. All images were colored with Prisma colored pencils and blended using baby oil. I started by making the inside of the house. The door was made on George with just squares and rectangles. I scored the door frame with my Martha Stewart score board. Once I had the door in place on my top layer, I cut out the doorway and then placed my Tiddly Ink characters in position on the paper behind. Once they were layered, I placed the inside on the top of the outside sheet and glued it down. Lastly, I embellished and made the tiny wreath over the door with rafia and some cute spider buttons. This project was so fun, and honestly it's part of why I haven't done anything else lately. It's been on my mind since the blog hop info. was mentioned!!! Make sure to head over to Tiddly Inks for the blog hop - the artistry from the people who are part of the hop will be amazing!!! I hope you enjoy - I did!!!
Wednesday, July 21, 2010
Pumpkin Paper Tutorial
In honor of the upcoming Tiddly Inks Blog Hop I decided to make some paper for a background to a LO for Halloween. I wanted to have just a simple pumpkin paper so I turned to my Gypsy. This is for an 8x8 sheet of paper. I took my ink spot "really rust" from Stampin' Up and a make-up sponge and inked up an 8x8 section of this spicy orange pumpkin paper from DCWV. I wanted to add some depth to the paper and the ink hit that need.
After I inked up the paper, I welded the border of pumpkins on Doodlecharms and simply aligned them in a row. I staggered them so they would look a bit different for each row. Next, I placed my cricut marker in my machine and attached my Gypsy to my Expressions. I had my settings on 4 blade depth, 3 speed and 2 pressure - this works best for me, but you might want to try it yourself first to see what works best for you. I then hit cut on my Gypsy.
I only covered an 8x8 section of my 12x12 paper so finally I had to trim the edges.
This is a simple way to make your own paper. You could go much more elaborate and add more details to the images too! I'm getting so excited for Halloween - it's a crafter's dream come true right? - And, I bought Mini Monsters so it should be arriving at my door soon! I think I'll give you a good review of the cartridge - let you know if it's worth purchasing - he he!
Enjoy!
Subscribe to:
Posts (Atom)