Saturday, April 30, 2011

Tiddly Inks Treasure Hunt and Blog Hop!!!

Photobucket
 Welcome me hearties to the beginning of a Birthday Bash to celebrate the one year Birthday of Tiddly Inks by the wonderfully talented artist Christy Croll!!  If you've just happened by today and want to join in the fun please START HERE at the Tiddly Inks Shop!  There is BOOTY to be found and we have a special treasure hunt...so in order to be in the KNOW start at the shop!  Now if you've come here from our special guest Nicole's Blog - you are on the right treasure map!!! 
Now for my projects!  I loved so many of the NEW RELEASE images that I had a hard time just picking one.  So I chose THREE - but I have to be honest there are so many gorgeous new releases that you will be seeing them from me for WEEKS!!  Here is the first I chose - HuggaBugga
Oh my gosh - aren't they just adorable - colored in Copics and matched with Basic Grey Paper from Oh Baby! Girl stack.
The imagine sentiment is a part of a collection of stamps that I picked up in a dollar bin at the CKC scrapbook convention!!!
I colored the ribbon with my Copic to have a perfectly matching bow!
I just love this adorable image and had a ton of fun coloring these sweeties and I had to make them the main focus of my card!
Next, I chose to use the sweet Rainbow Dreams!  Ok, who doesn't love a bright and CHEERY card.  Love this image because the rainbow can be tailored to all those yummy papers that you know you have in your stash and are too afraid to use. 
I colored her in Copics.  I also used my clear Spica pen to add some accents.  It's hard to see in the picture but there are accents on the clouds and her wings.
I also chose this GORGEOUS paper from Echo Park.  I love their papers and this is from the the Little Girl Stack.
I used a clear HELLO stamp sentiment from Clear and Simple Stamps.
Last but not least I chose this adorable image called You Are On My Mind.
 She is just too sweet and reminded me a bit of my oldest daughter.  I decided to make something special with this image for my daughter's room.
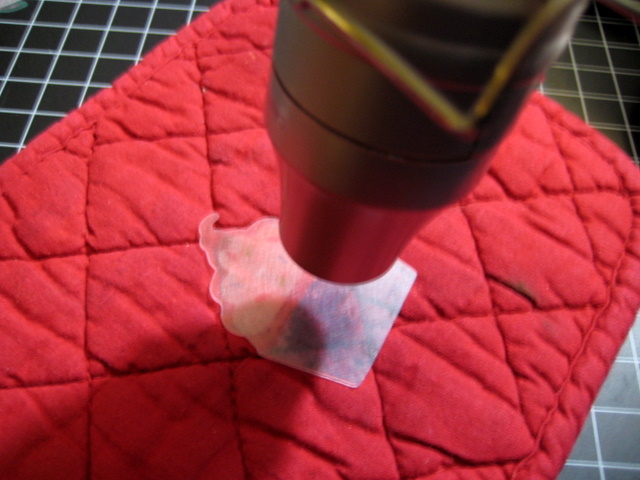
 She's turning 8 soon and is starting to get into the mode of girls only and girls rule!  I love it because I know it will change ever so fast...LOL.  This project was a bit more work as I cut out letters on my Cricut using the Hannah Montana cartridge.  I did a 3x multicut on cereal boxes. Inked the letters in Black Soot by Tim Holtz, UTEED them and then added some soft pink Perfect Pearls and reheated the UTEE.  I did the same to the chipboard arrow and flower.  The perfect pearls turned a really swirly pink color which looked awesome.  This technique isn't easy - but once I got the hang of it I had fun.
I added gems and flower accents to the large circle chipboard.  Oh and if you are wondering the paper here is also Echo Park.  OH and of course I colored this sweet Tiddly in my Copics!
One last picture of the door hanger on my daughter's door!
Make sure you are collecting the letters associated with Pirate Jane on the way!  You don't want to miss the secret message.
Pictured below is just one of the MANY prizes available!!  In this set of goodies you will find:  Cosmo Cricket 6x6 stack called Boyfriend, A variety of rub-ons, Inkadinkadoo and a Fiskar stamp set.  Also some metal embellishments including a few baby signs and colorful binder clips.  There is also a letter set of stickers and some Suzy Zoo stickers.  There is a collage sticker, crinkle ribbon and another small set of summer splash ribbon!
Now you are off to the wonderful guest designer Alex's blog!!! 

Thursday, April 28, 2011

Feel Better - Meljen's Designs Challenge


Hi ya everyone!
  Ok, so I totally didn't follow the challenge this week at Meljen's Designs Challenge blog with the new images that are ever so sweet:
All of them can be found right HERE at Whimsy Stamps.  I have some of the new images colored up but really wanted to use this mailbox because well I LOVE coloring these and honestly Melissa from Meljen's has so many adorable images that it's fun to go back and find some gorgeous older images - this image called Mailed With Love can be found right HERE!!  This mailbox shouts spring so I thought it perfect for a little note to a friend that isn't feeling so well.  I colored the image in Copics and tried a new swirly pattern in the background just to be different!
I used some super bright colors for this card using a stack from Basic Grey called Romani.  Aren't the papers yummy?  I also used a bit of crinkle ribbon for a bow that I then placed a button and Baker's twine on.
Finally, I added three little red gems!  That's it - quick, simple, bright and cheery!!!
Have a great day and don't forget to check out the challenge this week at Meljen's - make a bookmark - and you won't want to miss this magical release at Whimsy!

Wednesday, April 27, 2011

Tiddly Inks Treasure Hunt and Blog Hop!!!

 APRIL 30th
Oh my gosh - ok, I'm just too excited about this hop - so before Saturday I wanted to give everyone ONE more reminder!!! Don't forget - there is some awesome talent participating and Christy Croll of Tiddly Inks has outdone herself with some amazing new images!!!!  OH, I'm so excited to share with you my projects!!!!  Please stop by and have a great time!!!  Don't forget about the AWESOME PRIZES!!!

Tuesday, April 26, 2011

Sweet April Showers - Tiddly Inks Challenge

 Hi ya everyone!!
  This week at the Tiddly Inks Challenge Blog we are challenging you to create a card using rain showers and/or flowers for this spring season.  It seems that so many are talking about the weather and everyone is patiently waiting for warmer and sunnier weather.  I know in Portland we definitely are!
  I created this card using a new Tiddly Ink image called Flutterby.  I think she's so adorable - and for this challenge all I could think of was how stormy weather brings gorgeous summer days filled with flowers and butterflies.  I colored her in Copics and cut her out with my oval nestabilities.
 I created a scene using my Tim Holtz Inks - Black Soot, Broken China and Lavendar - these were used to make a stormy sky.  I also added some rain with markers. 
 I then took a sponge dabber and added clouds with Black Soot - then took my water pen and went over the clouds.  Finally, I added stickles to the clouds and rain.  I also computer generated my sentiment and used nestabilities.
Thanks for stopping by today and head over to the Tiddly Inks Challenge Blog to celebrate Spring with us!  Don't forget to use your own Tiddly image that can be found here - and Christy is already adding new images to the store right HERE!

Monday, April 25, 2011

Tiddly Inks Treasure Hunt - OH my the Prizes!!!

You WILL NOT want to miss this fun and inspiring hop!!! Christy the artist at Tiddly Inks has cooked up some seriously adorable NEW images!!! I'm not talking about just one adorable image - I'm not talking two, three or even four!!!  YES MORE!!!  So much cuteness - and well what's a treasure hunt without BOOTY - and by booty I mean surprises and prizes!!!! YAY!!!  So much fun - so get ready for April 30th.  Don't forget your eye patch either - with all the eye candy you might need it!!!! AAAAARRRRRRRRRRGGGGGGG!

BLOG HOP WINNER - Congratulations!!!

 
Hi ya everyone!  Thanks so much for joining us in the blog hop hosted by Gaby at Gaby Creates.  We had so much fun and so many people joined the hop.  I can only pick one winner though and that is....
LORI who left this comment
Thanks Lori for the kind words.  Please pick out one bundle (3 colors - $9.99 value) of crinkle ribbon and one bundle of bakers twine ($9.99 value) from My Craft Spot and email me your choices at melissaforquer at gmail dot com!

Congrats and thanks to all my new followers!!! I really enjoyed reading your comments!

Friday, April 22, 2011

Welcome to It's Earth Day It's My (Gaby's) Birthday Blog Hop

Happy Birthday Gaby and Happy Earth day too!
You should have arrived here from Liz's blog.


Photobucket
Wasn't her project just FABULOUS!!!

Now on to my project
 In celebration of Gaby's birthday and Earth day I decided to make a fabulous GREEN card.  I love the look of monochromatic and iCopic Lover (one of my new favorite blogs) is having a monochromatic challenge and it is in fact a day to celebrate being green (environmentally speaking) so I chose green!  I love this adorable Mo Manning stamp called Wonderful Day - it seems so fitting for a day to celebrate Gaby and the Earth.  I colored her in Copics.
Here are the following colors I chose:
The Happy Birthday stamp is also from Mo Manning and comes with the Wonderful Day set.  I simply layered a number of different papers.  The solid green is from Stampin' Up and the checkered paper is from the Basic Grey stack Baby Girl.  
 I also used my Martha Stewart punch to create a border close to the bottom of the card.
Now, hopefully you can see the baker's twine that I added to this card as well.  I bought this twine from Kimberly at My Craft Spot.  I really love this twine and it seems to be so popular right now. 
and because I love this twine and Kimberly's fast and great service if you leave a comment telling me your favorite color you will be entered to win a fabulous bunch of 3 crinkled ribbons of your choice and a set of Bakers Twine  from Kimberly at My Craft Spot.
My Craft Spot
I will chose my winner on Monday following the blog hop!

Now you are off to Linda's blog 


The Paper Boutique

In case you have just popped in and don't know anything about this hop - please start from the beginning at Gaby's blog.  Gaby has a number of sponsors so there will be lots of fun prizes but you have to complete the whole hop in order to win!  Here is the entire list of bloggers participating!

Thursday, April 21, 2011

Gaby's Blog Hop Tomorrow - Don't Forget


Hi ya Everyone!!!
  Gaby from Gaby's Creations is turning one year older and it's Earth Day so to celebrate she's hosting a blog hop!  Don't forget to come by tomorrow and join in!  There will be some fabulous prizes from Gaby herself and a number of the blogs will have prizes too!  It should be lots of fun!
Hugs

Monday, April 18, 2011

A Charming Idea - Shrinky Dinks and the Imagine

Hi ya everyone! I'm at She's A Sassy Lady again today to share with you a little project I made for my daughter.  Lately, I've seen a number of people using Shrinky Dink material to make little charms or pins.  I first saw this project at 217 Creations.  Elizabeth one of our own Sassy Designers made a darling little pin in honor of Autism Awareness.  I love this idea and wanted to modify it a bit to make charms.  Now, there are a few tutorials already available out in blog world however, there are a few things that some of those tutorials don't mention and I would like to show you how here. 
The best way to start is to have a checklist of items you will need:
  • Shrinky Dink Film Frosted/Graphix Inkjet Shrink Film
  • Imagine with favorite cartridge or Inkjet Printer with a number of cute images
  • Gypsy (optional)
  • Heat Gun
  • Chain for bracelet
  • Jump rings
  • Lobster fasteners
  • Pliers and tin snips or wire cutters


I used the Gypsy to set up this little project.  You don't have to - you have two options - 1) use some adorable images you find online and print them on an Inkjet printer then cut them out or 2) Go right from your Imagine.  I wanted to use the new application that is currently on my Gypsy.
Chose print and cut from the next screen:
The next screen that appears is this basic screen of shapes that comes with the Imagine.  From here you want to choose your cartridge - if you are choosing an Imagine cartridge click on this icon:
Now you can choose your cartridge - I chose the Imagine cartridge called YUMMY!
Your adorable images from the cartridge will now appear.  I picked a few of my favorites including this little cupcake.  Just click to choose.
Once I choose my first image I want to resize it - the shrink film will reduce to about half - I chose 2 inches for a good size.  Certain images will have to be even smaller as the length is long - the piece of candy is one such case.  Here is how I adjust the size.  Click on the image once it's up on your bar.  Then click the pencil and you can edit the item.  This is what you will see first.  Down at the bottom you can see where I adjusted the size to 2.
The great thing about the Imagine is once you choose this size all items will automatically be set at this.  I did shrink the candy and the banana split to 1.5.  After you have all images chosen and have set all the sizes you click the next icon.  This will bring you to this screen.
My shrink film is 8x10.  Here I set the paper size.  Also, on this screen is the Cut settings - I chose 3 multi-cut and leave the speed and pressure at 5.
At this point you will see exactly what the Imagine will cut along with the paper size.  Anything in white is paper and anything green is mat.
The other good thing about the Imagine and the Gypsy feature is that you don't have to turn them on in any particular order.  So I just plug my Gypsy right into my Imagine to begin.  I also have to insert the Yummy cartridge into the Imagine - the Gypsy does not allow you to not have your Imagine cartridges at this time.
Next, on the Gypsy I click the Next button to begin cutting.  The Imagine jumps to life and looks like this:
Here you can see the images printed and now cutting on the Imagine.  The multi-cut remember is set to 3 so this process takes a bit of time.
Here are the cuts.  Next, punch your whole in the shrinky material BEFORE shrinking.
and here is the hole for the jump ring:
Next, shrink material under heat gun.  The material will wrinkle but don't worry - this is supposed to happen just concentrate your heat on the center until it flattens back.
Here are all the little charms shrunk down.  Next time I will use the film specifically for Inkjet printers because it's white - this is sort of translucent and frosted and the colors just aren't as vibrant.
 These are the items I will use next.  I chose a real light silvery chain and attachments.  
Attach each jump ring through the charm and leave open.
Choose a length of chain and attach your lobster claw to one end and a jump ring to the other.  Next attach your charms!  Here you have an adorable little charm bracelet!
Thanks for stopping by today!  I'd love to hear your comments and please feel free to ask questions too!  For more fun projects and tutorials head over to She's A Sassy Lady!
Thanks and big hugs!