Hi ya everyone! Today is my day to share at the Creative Critterz Imaginations blog. This week we are creating layouts about ourselves! Talk about a difficult theme! LOL!! My day always starts with a cup of coffee and well without it I'm just not me hence the title of Just Add Coffee! I used Cricut Craft Room*please note that Cricut Craft Room is open to beta testers at this point and not the public* to design my layout. Did you know that you can see each element of your 12 x 12 page? I love this feature. I can see exactly what I like before I cut and print paper! What does this mean?? You save paper and time...and who doesn't like that!
Recipe:
Imagine
12 x 12 White Paper
Cricut Imagine Yummy Cartridge
Cricut Mini Monograms Cartridge
Cricut Calligraphy Collection Cartridge
Glitter Glue
Small foam pop dots
Pearls
Sewing Machine for Stitching
I completed each element on the Cricut Craft Room program. I then turned to my Imagine and sized each element based on the settings on the Craft Room.
I used the layers feature a number of times to separate layers on the Imagine. For each I added small pop dots to create dimension.
I added stitching, pearls and sparkle to the layout for an extra finishing touch.
Hi ya everyone!
Thought I would share a little Imagine project using the Yummy cartridge and my Imagine. I also used the Mother's Day Bouqet cartridge but used the Imagine to cut and print them in a gorgeous pale shade of pink also from the Yummy cartridge.
Have you ever had a project that started simple enough? This one sure did - with a card...
I simply cut out the shapes from the Imagine - popped a few of the letters - used all this yummy printed paper (can you believe each piece was WHITE before I started!!?), pieced the card together and added some baker's twine and a button. My card was simple and elegant but I thought - oh how cute would a little treat box be with it.
So I started making a treat box...
The box is from the Yummy cartridge as well. The pattern that prints with it however wasn't what I wanted - so I just changed it to this adorable light floral paper. The problem was there were no guidelines for folding and it's a bit complicated. So I simple cut out a template and used the lines from that and scored both at the same time. Added a tag and some eyelets - oh and don't forget some decadent candies and was done...
Well not so much - I then decided to make a little plaque...
Now can you see how one project turned into three!? I have a number of these little wooden plaques that I've had so much fun decorating lately. Again, I headed for the Yummy cartridge printed out my papers and sentiments and also printed paper for the flowers. I used a bit of B000 and B01 Copic to color the flower centers and for the leaves I used a YG03. Adhered them together with some tiny silver brads and attached them to the plaque. I added more twine and a button to finish off the project.
Now I have an adorable little gift set to give to someone when their special day roles around and to think this all started with a card!
Hi ya everyone! I'm at She's A Sassy Lady again today to share with you a little project I made for my daughter. Lately, I've seen a number of people using Shrinky Dink material to make little charms or pins. I first saw this project at 217 Creations. Elizabeth one of our own Sassy Designers made a darling little pin in honor of Autism Awareness. I love this idea and wanted to modify it a bit to make charms. Now, there are a few tutorials already available out in blog world however, there are a few things that some of those tutorials don't mention and I would like to show you how here.
The best way to start is to have a checklist of items you will need:
Shrinky Dink Film Frosted/Graphix Inkjet Shrink Film
Imagine with favorite cartridge or Inkjet Printer with a number of cute images
Gypsy (optional)
Heat Gun
Chain for bracelet
Jump rings
Lobster fasteners
Pliers and tin snips or wire cutters
I used the Gypsy to set up this little project. You don't have to - you have two options - 1) use some adorable images you find online and print them on an Inkjet printer then cut them out or 2) Go right from your Imagine. I wanted to use the new application that is currently on my Gypsy.
Chose print and cut from the next screen:
The next screen that appears is this basic screen of shapes that comes with the Imagine. From here you want to choose your cartridge - if you are choosing an Imagine cartridge click on this icon:
Now you can choose your cartridge - I chose the Imagine cartridge called YUMMY!
Your adorable images from the cartridge will now appear. I picked a few of my favorites including this little cupcake. Just click to choose.
Once I choose my first image I want to resize it - the shrink film will reduce to about half - I chose 2 inches for a good size. Certain images will have to be even smaller as the length is long - the piece of candy is one such case. Here is how I adjust the size. Click on the image once it's up on your bar. Then click the pencil and you can edit the item. This is what you will see first. Down at the bottom you can see where I adjusted the size to 2.
The great thing about the Imagine is once you choose this size all items will automatically be set at this. I did shrink the candy and the banana split to 1.5. After you have all images chosen and have set all the sizes you click the next icon. This will bring you to this screen.
My shrink film is 8x10. Here I set the paper size. Also, on this screen is the Cut settings - I chose 3 multi-cut and leave the speed and pressure at 5.
At this point you will see exactly what the Imagine will cut along with the paper size. Anything in white is paper and anything green is mat.
The other good thing about the Imagine and the Gypsy feature is that you don't have to turn them on in any particular order. So I just plug my Gypsy right into my Imagine to begin. I also have to insert the Yummy cartridge into the Imagine - the Gypsy does not allow you to not have your Imagine cartridges at this time.
Next, on the Gypsy I click the Next button to begin cutting. The Imagine jumps to life and looks like this:
Here you can see the images printed and now cutting on the Imagine. The multi-cut remember is set to 3 so this process takes a bit of time.
Here are the cuts. Next, punch your whole in the shrinky material BEFORE shrinking.
and here is the hole for the jump ring:
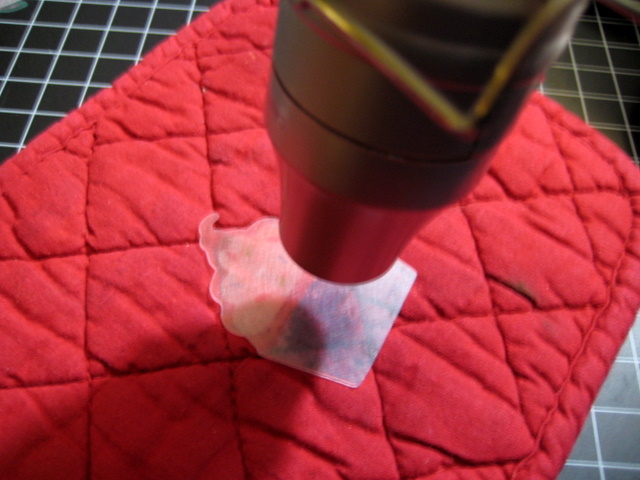
Next, shrink material under heat gun. The material will wrinkle but don't worry - this is supposed to happen just concentrate your heat on the center until it flattens back.
Here are all the little charms shrunk down. Next time I will use the film specifically for Inkjet printers because it's white - this is sort of translucent and frosted and the colors just aren't as vibrant.
These are the items I will use next. I chose a real light silvery chain and attachments.
Attach each jump ring through the charm and leave open.
Choose a length of chain and attach your lobster claw to one end and a jump ring to the other. Next attach your charms! Here you have an adorable little charm bracelet!
Thanks for stopping by today! I'd love to hear your comments and please feel free to ask questions too! For more fun projects and tutorials head over to She's A Sassy Lady!
Thanks and big hugs!


 I used the layers feature a number of times to separate layers on the Imagine. For each I added small pop dots to create dimension.
 I added stitching, pearls and sparkle to the layout for an extra finishing touch.