Hi ya everyone! If you are looking for my Tiddly Inks post please scroll down to the next post!
Today is my first time posting for Pam at The Bug Bytes ! Thank you so much Pam for letting me share with everyone today on your wonderful blog!
Today, I want to share a little mini album with little tickets that I made for my husband for Valentine's Day! This was inspired by Donna Mundinger's mini album found here. Donna's is gorgeous - I wanted something a bit less fancy since my this is for my hubs and he's a pretty simple guy!
Here is how I did it!
First, I started with five sheets of white paper sized at 5 1/2 inch x 4 1/4 inch.
Next, I took my roller, a Cuttlebug Heart embossing folder and my Tim Holtz Brick Red Ink.
Roll the roller right through the ink as shown.
Roll the inked roller on one side of the embossing folder.
Next, place your sheet of paper cut at 5 1/2 x 4 1/4 inch in your inked embossing folder on the opposite side if the ink.
I used my A plate and two B plates and placed the folder between the A and B plates and ran these through my Cuddlebug.
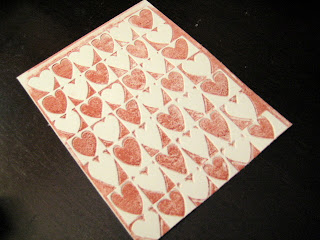
This is my final sheet after inking and running through the CuddleBug - I did five just like this.
I took five empty roles of toilet paper and flattened them in a book prior to starting this project. I wrapped each toilet paper role in the embossed paper by adhereing with my ATG gun as shown.
Again, I repeated this five times to cover each toilet paper roll.
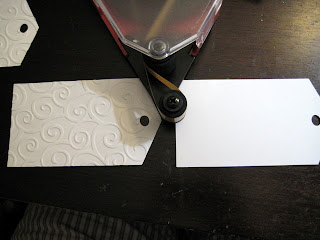
Next, I got my Gypsy and cut tags that would fit in these roles.
I cut two tags for each roll for a total of 10 tags - I did this to have very sturdy tags. Next, I embossed one side with my Divine Swirls folder and attached the two with my ATG gun.
I added a bit of silky red ribbon to each edge of the pocket.
Next, I computer generated a number of things I wanted to do for my husband for Valentine's Day. Each one of these was going to be placed on a ticket and slipped into the little holder. I then used my oval Nestable to cut out the sentiments.
First, I taped down the nestable so that the sentiment was centered in the nestable. Then I placed my A and C plate in my Cuddlebug. I placed my nestable taped to my sentiment upside down so the cutting side was up. I placed my B plate on top and ran through my CuddleBug.
Next, I embossed the edge of the oval nestable. I left the cut piece in the oval flipped upside down. I placed a rubber embossing mat on top.
Next, I placed three thick pieces of cardstock and a B plate and again ran through my Cuddlebug.
See the gorgeous edge my nestable creates. I love this look!
I took my Red Brick Tim Holtz ink again and inked the outside edge of each oval by working in a circular motion starting a my craft mat (wax paper) and slowly working into the tag.
Once my sentiments were inked and my tags prepared I glued the sentiments to the tags.
Then I finished the tags with a red silky ribbon.
I used my Cropodile to punch a hole through all five corners and looped a ring through.
I hope you enjoyed my project. Please check out Pam's blog at The Bug Bytes to see more fun projects! Thanks Pam for allowing me to share today!


Oh wow such a wonderful idea thank you for sharing.
ReplyDeletethis is THE CUTEST Melissa!!! thanks for showing us step by step!!
ReplyDeleteHUGS!
Oh, this is just amazing!!! Soooo clever and cute! Toilet paper rolls, huh??? LOL Who woulda thunk it? :) Brilliant!
ReplyDeleteLove the album! Amazing! It ain't easy to make and decorate a masculine project. But you did it and it turned out so awesome!
ReplyDeleteSo crafty & creative. Love it. :)
ReplyDeleteMelissa,
ReplyDeleteHow do you do so much. You are so creative and so talented. You must never sleep. LOL. I do love your little mini-book you made.
WooHoo. Melissa! LOVe your little album and thanks for the shout out and tip for inking your CB folder. I never have much luck with that and yours turned out soooo perfect! Now I just need to find that brayer. LOL I'm sure hubby will love it. Especially the kid free day! xxD
ReplyDeleteMelissa you did a beautiful job with your instructions...and these are just beautiful... your work always is... because you are such a beautiful person inside and out.
ReplyDeleteHugs
Jeannie
Wow this tutorial is amazing Melissa! Asewome idea and it looks really fabulous!
ReplyDeleteHugs,
Larissa
Ps I used a silhouette template for my box.
Melissa this is GORGEOUS and I know it is hard to make that something special for the men in our life but you did WONDERFUL! TFS
ReplyDeleteWow, this is such a fantastic idea Melissa! I love the inked embossing folder tip. I'm sure your husband will love thse. Thanks for the great tutorial.
ReplyDeleteThis is a great tutorial, Melissa. Thanks for the great instructions and inspiration.
ReplyDelete