Showing posts with label MiniMonograms. Show all posts

Wednesday, August 10, 2011

Just Add Coffee - Creative Critterz Imaginations Self Layout

Hi ya everyone!  Today is my day to share at the Creative Critterz Imaginations blog.  This week we are creating layouts about ourselves!  Talk about a difficult theme! LOL!!  My day always starts with a cup of coffee and well without it I'm just not me hence the title of Just Add Coffee!  I used Cricut Craft Room *please note that Cricut Craft Room is open to beta testers at this point and not the public* to design my layout.  Did you know that you can see each element of your 12 x 12 page?  I love this feature.  I can see exactly what I like before I cut and print paper!  What does this mean?? You save paper and time...and who doesn't like that!

Recipe:
Imagine
12 x 12 White Paper
Cricut Imagine Yummy Cartridge
Cricut Mini Monograms Cartridge
Cricut Calligraphy Collection Cartridge
Glitter Glue
Small foam pop dots
Pearls
Sewing Machine for Stitching
I completed each element on the Cricut Craft Room program.  I then turned to my Imagine and sized each element based on the settings on the Craft Room.
I used the layers feature a number of times to separate layers on the Imagine.  For each I added small pop dots to create dimension.
I added stitching, pearls and sparkle to the layout for an extra finishing touch.

Monday, March 21, 2011

No Nestabilities - No Problem - A Tutorial

Hi ya everyone!
I am at She's A Sassy Lady again today to share a tutorial.  I love Sheila's blog because each day she has tutorials that help me learn new techniques.  I feel so honored to be part of her design team and want to give her a special thank you!  Thank you Sheila!  Now, on to my card for today.  I hear a number of people complain about the cost of Spellbinders Nestabilities.  I love them and am willing to pay the cost.  They make things so easy.  However, if you've invested in a Cricut you don't want to spend the extra money for more things that might not be necessary.  So today I've created a tutorial using your Gypsy and Expression - you could use Design Studio or SCAL too.
First I colored this sweet little bunny from Meljen's Designs in my Copics.  I cut her out using my paper trimmer to the size I wanted.  I'm not limited by a nestable size now. 
Next, I grabbed my Gypsy and using George and Basic Shapes created an exact match of the bunny rectangle using my Actual Size button.
I use this as a template only and will not cut this square on my Expressions.  Next, I find a shape I like to be a background edge to the bunny.  I like the scalloped square shape and chose this from Mini Monograms along with the shapes shadow.
I then lined each image together to make sure the desired measurements were accurate.
Then I separated the images and deleted the rectangle template.  I then laid each scalloped square out on my G like this.
I then chose papers that I liked to match my image.  These are left over scraps from a set of Stampin' Up paper (patterned) and solids from my Blues and Earth tone Cricut Stack.
I cut out my scalloped rectangles on my Expressions next and laid out my card.
I like this card already but thought some sweet embellishments would make it nicer.  I don't have a lot of flowers and pretty stickers laying around to match so I decided to use my cheap little punches to make some cute flowers and embellishments.
I simply punch out a few shapes in matching papers and layer them with a tiny bit of glue.  To the flowers I add small pearls to the center.
After finishing a number of these small embellishments I decide to use a bit of stitching on my card.
 I have brown thread already in my machine.  What I want to show you is how to make a nice corner with your sewing machine in case you don't already know how.  First, I adhere my pieces that I want to stitch with a single small swipe of ATG adhesive right in the middle.
 I don't want my needle to pass through adhesive.  Next I place my card in my machine and sew a stitch starting at one corner and feeding down to the next corner.  At this point I LEAVE my needle in the paper and gently twist the paper to the next side to stitch - never taking the needle out.  Your last stitch on one side is your next stitch on the next side.
Here is the final corner after stitching all the way around using this method.
I did the same to the small bunny image too.
After my stitching was complete I added all the layers and embellishments.  Now you have a look like you used the nestables from Spellbinders but you used what you might already have!
 Thanks for checking out my tutorial today!  If you have any questions please ask away in the comments section!  I also love to here your positive thoughts too!  Thanks for stopping by and you can find more fun projects and tutorial at She's A Sassy Lady!!


Saturday, December 11, 2010

All That Glitters Blog Hop - Candle Wraps

Hi Ya Everyone!
  Today is finally here and I'm so excited to be sharing my project with you.  But first, a few details.  If you didn't know there was a blog hop going on today called All That Glitters - that's ok, it's easy for you to join in!  At the bottom of my post you will see a whole list of the participating bloggers from beginning to end or we have a Next Blog button that you can simply click on to take you to the next blog.  Just keep clicking on this from blog to blog until you come back to my blog!  However, if you find yourself stuck somewhere just refer to the list and get back on track!

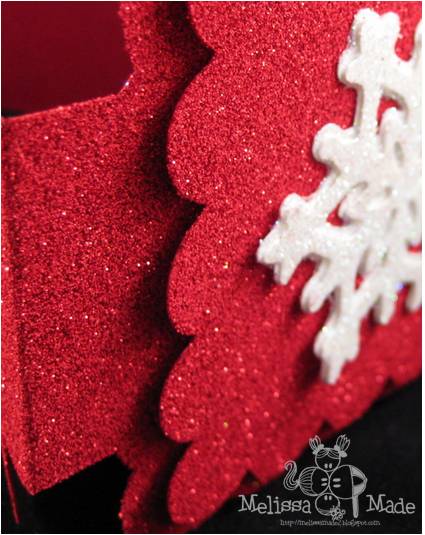
  Now, on to my project.  I decided my dining room table needed some sprucing up this Christmas!  I have a number of red and white Christmas dishes and decided to add a centerpiece and some pretty candles.  First, I didn't really craft anything for the glass sconce.  I simply filled it with some pine cones, cinnamon sticks, and ornaments.  Lastly, I added some soft glittery snow.  My candles will stand on either side of my sconce.  The candles looked extremely plain so I decided to make some "wraps" for when the candles are on the table unlit.  I used MiniMonograms to cut out the scalloped squares, but first on my Gypsy I welded a few rectangles to each shadow feature of the scalloped square. 

These are to act as fasteners because I wanted the shape to be somewhat triangle to fit around the candle.  I also wanted them larger then a 12x12 piece so one would have to be adhered separate.  The tabs allowed me to do this as well.  Now, for the fun part, each piece was run through my Xyron upside down.  For the red I used embossing powder that has a sparkle in it.  Why might you ask??  It's SO much cheaper then glitter - and Michaels was all out of RED GLITTER!!! YUP!  But, they turned out AMAZING with this stuff and honestly it was a little less messy. 

My snowflakes were from Christmas cartridge and I chose to cover them in a very fine soft crystal glitter.  Love this stuff because it has such a soft shimmery sparkle.  I layered the shadow feature and the normal cut after running them through the Xyron and placed them on the scalloped square.  Then I popped that square out from the shadow with the Pop Dots.  Finally, I used my MS scoreboard and scored the tabs right in the center and attached the tabs together using my adhesive. 

I love these - but will not use them with lit candles - I'm only demonstrating here and wanted my photos to look nice.  DO NOT USE WITH LIT CANDLES - CANDLES CAN BURN DOWN AND CATCH THE PAPER ON FIRE!!!  These are only for decorative appearance on my table when my candles are NOT lit! 


Now, BLOG CANDY!!! 
You do not have to be a follower to receive my blog candy.  I would however love it if you followed because you enjoyed my project and my blog.  
I would like you to leave a comment and I want
you to tell me what your favorite
Christmas present is and who gave it to you! 
Please feel free to email me if you are making your own and have questions my email is right under my blog title. Now, HOP everyone and have a great time!!!  Some bloggers will have posts each day of the hop and prizes for each of those days!!!!  So have fun and stop by each day to see new things - you have until midnight on the 13th to leave a comment under the posts to be eligible for my blog candy!  Now, head over to Sheila for an awesome, beautiful and fantastic project and tutorial!!!


MelissaMade - that's a me!

Friday, November 26, 2010

Giving Thanks - Paper Cutz Challenge

Hi everyone,
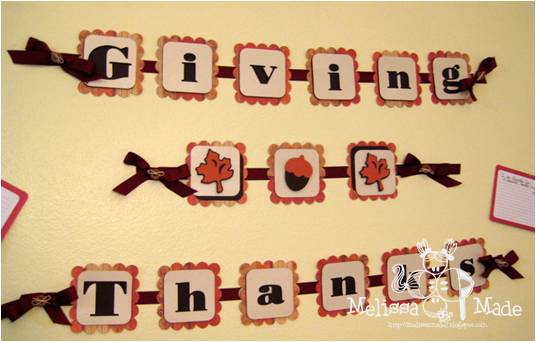
  Anything goes at Paper Cutz this week - which was a blessing because I really wanted to make this for my house and my husband and I liked the idea of a new Thanksgiving Day tradition.  I made a banner using my Gypsy, MiniMonograms and Cindy Loo font, an Acorn from Create A Critters and a maple leaf from Gypsy Wanderings.
  I chose the scalloped square and plain rounded square from MiniMonograms and used the font from Cindy Loo. 

This was inspired by Donna Mundingers Halloween banner found here.  Once I had the blocks and letters cut out I popped the top layer off the bottom.  I then used my ATG tape roller and taped all blocks to a maroon ribbon.  I then tied bows with buttons looped with hemp twine and used a glue dot to stick them to the edge ribbons. 

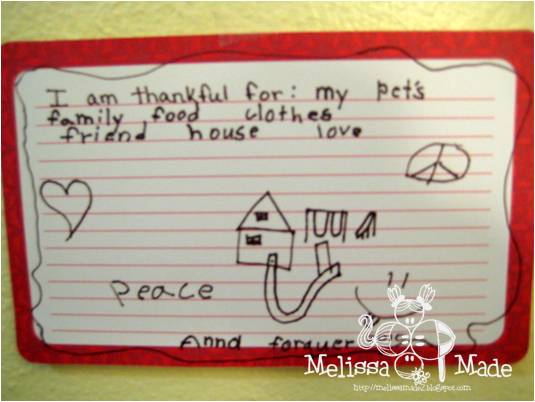
Finally, I found some recipe cards at Michaels for one dollar a set (20 cards).  I wrote at the top - I'm thankful for:  and each guest wrote what they were thankful for and hung it to the wall. 

We will keep these and each year hang them up on the wall and ask our new guests to write what they are thankful for.  This will allow us to remember our Thanksgivings and when hubby and I are old and gray we will have a number of cards to read and reminisce. 
Hope your bellies have recovered!!! Mine is starting too!  Don't forget to link your project over at Paper Cutz - there's no reason not too - it's anything goes!!!
Enjoy!

Tuesday, September 7, 2010

Hoppy Birthday Sheila!!!

Hey Everyone!
  Tomorrow is Sheila's Birthday - aka She's A Sassy Lady.  She is a wonderful inspiration and is always making the loveliest cards and layouts.  I'm so excited to give her this card.  Actually, it's already in the mail - but I have a feeling it's going to be a bit late!  So I'm giving it to her electronically here a day early so she won't think I forgot!! LOL  I made this card using her fabulous window technique using the Gypsy.  I found a perfect window with this scalloped edge on Mini Monograms.  Although, it had an extra window so I hid that.

 I took shadow letters from Nursery Rhymes and welded them together to spell Hoppy Birthday on the top and bottom of the window.  Finally, I attached the words with the little bunny shadow from Give a Hoot.  The balloon happened to fit right over the O in Hoppy!  I cut this all out and added an extra layer on the front.  The bunny was run upside down in my Xyron and I added some flocking to his belly and body.  Next, I added a bit of smooch on his mouth and gave him little black eyes and a nose.  I topped him off with a little rosy cheek using some chalk. 

I used a string instead of the cricut string for the balloon and popped the balloon over the O.  I also added all the letters to the top of the shadow.  The paper used was all Basic Grey - Cappella.  On the inside I placed a matching stripe and a black piece for a sentiment.  I wrote with my gelly roll pen on the inside!
Hoppy Birthday Sheila!!!
Enjoy!