Sunday, June 27, 2010

Be A Kid - Happy Birthday

I have a friend at work that will be turning a young young young 25 while we are on our conference trip.  She will only have us, her coworkers.  So I made her this Birthday card using a stamp from Pollycraft - Felicity Swing.  It looks so much like her actually and that's why I picked it!!!  I am starting to love digi stamps - I'm not really good at stamping myself so I can do what I want with them on my computer - add a sentiment or change the size a bit.  Anyhow, I used KaiserCraft - Lilac Avenue Collection  paper I got at our local craft store.  Isn't it YUMMY!!!  I love it - all the soft purples and yellows so remind me of summer.  I colored the stamp with Prizma colored pencils and used baby oil to blend.  Embossed a small part of one paper and added this cute purple running sticker.    Added a bit of yellow ribbon and done!  I also used the same image to make her a cute bookmark!
Enjoy!
For those of you that want a g file.  Here's my email:  shoot me an email and I'd be happy to send you it when I get back which will be Thurdsday:  melissaforquer@gmail.com

Saturday, June 26, 2010

My Hubby's Got Game! - A Father's Day Card

Ok - OK! Don't totally wipe me off your blog list because of this card.  My sweet husband is a gamer at heart.  He's been playing video games since he was a small boy...and to this day he still loves a good video game.  Now, I'm not talking Grand Theft Auto or anything like that.  He likes to play a wide range of games - anything on the Wii, the X-box, or the Playstation - yes that's right he has all three!!!  We both believe that our hobbies make us happy, so we get to do them when we aren't busy with the girls or eachother - which is really not too often, but enough to make us both happy.  So, for father's day I wanted to make him a special card, so I decided to do an X-box controller...one problem there is NO cart out there for the gamer!  LOL, so I decided to use George (go figure) and weld images together.  The buttons on the controller were easy, but the shape of the controller was not until I found images that would work.  IF you have a gamer in your life and you want to make this card for him/her - please email me for the gypsy file.
Enjoy!

Friday, June 25, 2010

I'll Miss You Beary Much - for my husband

I have to go to a scientific conference for my job.  This means I leave my hubby and two girls!  It's very hard for me as I can't stand the thought of my family without me - or better yet, me without my family.  A number of people have said, "Aren't you excited to have a week away from your kids?".  Truthfully, the answer is no.  I love my family and I truly love watching my children grow and laugh and play.  I truly love getting sweet kisses from my hubby at night...so leaving is not an easy thing.  However, it's a necessity for my current job.  So, with a heavy heart I made a card for my hubby just to let him know that I'll be thinking of him and the girls and missing him BEARY much!  The paper did most of the work for me, all I did was color the bear with my colored pencils.  I got the image for free from Meljen's Designs.  The sentiment said "I'm sorry".  I just cut it off and instead wrote inside - I'll miss you beary much. 
For the next week, I won't be posting very much due to the meeting.  The last few days before I go I will want to spend with my family.  I'll be back soon!  Thanks and Enjoy!

Thursday, June 24, 2010

Read, Read, Read

My seven year old has just really begun to get excited about reading. It seemed like we tried and tried but she was uninterested until her first grade teacher got a hold of her! Her teacher was wonderful and her reading skills improved immensely throughout the year. Needless to say, we are so proud of her. So when The Cuttlebug Spot's design team provided inspiration using embossed tags I knew I wanted to make a bookmark for Anna. I knew black and pink were the colors as she is always telling me - "mommy, black and pink look so good together!" I also knew that I had to add something Hannah Montana - I actually got this cart because of all the fun fonts - but Anna was very excited by this purchase! So the guitar made it's way into the project as well. Now, since I decided to make this based on The Cuttlebug Spot's Challenge - I decided to use my cuttlebug to enhance the tag a bit - what a difference that made!

Ok, I used the Hannah Montana cart and Tags, Bags, Boxes and More and Plantin Schoolbook. I actually copied the tag I chose and used it to modify a pocket. I didn't want the pocket so deep that it covered up the whole tag. It was very simple and I have the cut file if you'd like. I decided to use my DCWV glitter stack because it has some great glittery black and white. I also used black cardstock and some pink butterfly foil paper from DCWV. I cuttlebugged the star endcaps, a clear piece of plastic for the pocket and the stars. I also glittered the embossed portion of the stars. I can't wait to give this to her - she's going to love it and hopefully it will encourage her to keep reading. On a side note we just finished Harry Potter (the first book) with her and she LOVED it and can't wait to read the next!!! However, if you asked her what her favorite book is she'd say Pinkalicious. If you asked me - Edward Abby's The Black Sun! What's yours???  I decided to enter this into another challenge over at The Corrosive Challenge Blog.

Enjoy!

Wednesday, June 23, 2010

Have Your Cake and Eat It Too!!!

Hi all!
First off, I'm so happy to see so many followers!  I really appreciate everyone's interest in my blog and I hope to continue creating for you to enjoy.  Hopefully, I'll inspire some of you to make your own creations to share.  I love all of your comments and appreciate the feedback - without it, I wouldn't continue to post my work.

I need a birthday card for my mom and thought I would try out this digi stamp I got free at Sliekje digi Stamps.  She's an amazing artist and shares all of her work for free.  If you decide to use any of her images please leave her a little blog love as it's truly amazing that she shares all of her images.  I used my G for this project (of course, I love that thing - anyone thinking about getting one, but not so sure they'll like it - trust me YOU'LL LOVE IT).  I only used Wild Card cart for this project.  I used all frames - Welded the two ovals together for the card.  I also used a few other oval images from the frame section - including a frame that I put around my mouse image.  I really wanted the frame to pop and not the frame and mouse, but because I printed this out on my printer - I couldn't really get my cricut to cut the mouse out too...really need nesties for this, right?  I've never used them, but I here other creative ladies talk about them a lot.  Anyhow, I colored the mouse using the prizma/baby oil technique.  I then used my Zig pen and some fine glitter to shimmer up the cake.  I cut out little strawberries from the strawberry paper and added some to the image too.  Finally, I took the yellow Stickles to the candle flames and added a few blingy rhinestones.  Not too sure if this passes for my mom's birthday (of course I want a card for her to be perfect - lol), but if not, it will go in my stash!
I'm also submitting this to Cute Card Thursday for a challenge. 
Enjoy!

Tuesday, June 22, 2010

City Honeymoon Vacation!

The theme this week over at the Cricut Cardz challenge is vacation - perfect for this time of year. As soon as I saw their challenge I thought City Vacation!!! Then I thought, oh, how great would it be if my hubby and I could get away (just the two of us - LOL yeah RIGHT) for an evening in downtown Portland. Now, the weather has been awful here, but I just pictured the two of us out having a glass of wine and a great dinner at a little outside cafe. *Sigh* ok, back to reality. This card popped into my head - and a honeymoon vacation would be the perfect time, right?

Ok, so a lot went into this fun card. The size of the card fits a business sized envelope. I used Designer's Calendar for the honeymoon vacation - welded on my G, George and Basic Shapes to recreate the lamp posts as I don't have a cart with a darn one! I used Just Because Cards for the little red car, Plantin Schoolbook for the city scene which again was welded, stretched and flipped on the G and Sweethearts for the couple. I used a variety of paper, some just from my stash and some Tim Holtz ideology. I inked with Stazon black ink. The couple I cut on white cardstock - and then colored their clothes with Prizma Colored Pencils and baby oil. After I added the couple to the front city scene I popped that whole front scene with pop dots. After the card was assembled, I went through with my yellow, red, gold, and sparkle stickles to add lights to the buildings and cars as well as to the night sky. I followed with my black sharpie to make darkened windows in the buildings as well. In addition, I used my white jelly roll pen to add a few doodles on the words, give the car a white walled look and a few more stars to the sky. I also used my silver jelly roll pen to touch up the lamp posts, the car, and added a barrette to the girl’s hair. WHEW, that was a lot!!! But I like the way it turned out. As always I have the G file if you would like - she got a big workout with this one because of all the welding!
Enjoy!

Monday, June 21, 2010

Prizma Pencil Holder - Reduce, Reuse, Recycle!


Ok, so I'm a crafter that would rather spend my money on cartridges, embellishments, and fun stuff for my actual layouts, cards, and projects. However, there are things that we crafters NEED, a place to put all of our goodies for instance. Well, I have a nook in the corner of our living room as my hubby, two girls and I live in a condo!! We want a house, but as we all know, the housing market isn't so great right now so we wait. I came home on my birthday a few years ago to find that my sweet hubby made me a tiny little crafting area. Complete with a nice desk, two little shelves, and a large bookshelf. It was probably the sweetest thing anyone has done for me. We have so little room and yet he took the time to give me something he knew I would love and use...he's amazing right? Anyhow, on my desk, as most crafters, there are lots of pens, pencils, scissors, etc...I could go on and on. Well my small, but real problem, is that I have a pretty little vase filled with these items. It was getting WAY to crowded. Recently, I started coloring using the Magic Pencil Technique - check it out on  Sue's site.  I've modified a bit, I use baby oil instead of the Gamsol, but pretty much stick to her methods as her work is AMAZING.  Anyhow, I added all these colored pencils to my stash and just have NO where to put them.  I really wanted that desk top carousel from Memory Makers but it's a lot and like I said I'd rather spend it on my stash.  So, I made my own holder.  I reused an old wipes container that I'd been eyeing for something crafty.  Here's how I did it:
Step 1
Find a good container - one that has a large opening at the top - a clorox wipe container, a wipes container, anything that's plastic and can be weighted down.  Next cut your paper to fit around and maybe some ribbon.  I tried ribbon but it didn't match so instead I used my Stampin' Up stash and used green for the base and added the mulberry color to the top, bottom, and middle.

Step 2
I grabbed a cute image a gal over at the cricut board had sent me and colored it using the technique I mention above.  I then mounted that image on some more Stampin' Up paper and glued it down to the container.  Make sure your edges have adhesive on them as you don't want corners sticking out!
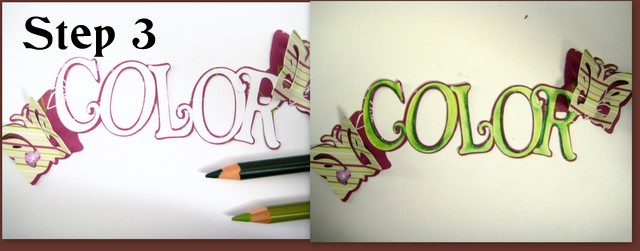
Step 3
I used my Gypsy and welded the shadow letters COLOR from Nursery Rhymes cart.  I then enlarged them so that I had an image that was 4.19 x 2.14.  Next, I welded butterfly shadows from the Gypsy Wanderings cart (1.49 x 1.15) to the word.  I cut them out in more Stampin' Up paper.  However, the letters that went onto the shadow I cut out on Georgia Pacific 110lb paper.  I did this so I could color the letters using the technique mentioned above.

Step 4
Embellish, Embellish, Embellish!!!  I added more butterflies, some ribbon and a bow, lots of pearls and rhinestones.
Step 5
Finally, in order to have something that wouldn't tip over, I went outside and grabbed some rocks!  That's right ROCKS..flat ones.  I wanted to use heavy washers, but alas we had none!  Next, I added a styrofoam circle that was headed to the trash (yes, recycled again!) over top the rocks.  Then to make it look nicer I added a piece of cardboard over the styrofoam. 

And it turned out great, and I can have my pencils right on my desk and I didn't spend a penny!!!  Well, except for the paper and embellishments! LOL! 
Enjoy!

I'm also submitting this over at Frosted Designs for their "What's Around Your House" Challenge.  Check it Out!

Sunday, June 20, 2010

Father's Day Card - Jeannie Phillips Inspired


I felt like I hit the jackpot while checking out BBTB2 the other day. I've been trying to put together a father's day card for dad. I had an awful crafting week a few weeks back and tried to make a nice fish card. My absolute favorite memory is of my father and I fishing. We used to go out the night before and catch night crawlers, large worms, and put them in a coffee can filled with dirt. This was really fun, really!!!! The worms would lie across the ground and you had to sneak up on them...lol. The next day we'd go fishing at a local pond. Anyhow, I really wanted to make him a card with a fishing scene. I made this card:


and I hated it. I had glued on something sideways and had to rip it back off and start over - but it left a gluey smear behind...the colors just didn't seem to go well...ah, live and learn - and it went in my stash. Then I saw that Jeannie Phillips, A Place for My Cards, had posted a fish card on her blog. I then checked out BBTB2 and had all the inspiration I needed. Those ladies put together a wonderful segment using the fish cut from Camp Out. I have that same fish on Potpourri Basket and had used it on the first fish card, but decided I wanted a string of fish and to actually use a fishing clamp that my hubby had. All my inspiration for the card came from Jeannie and the gang over at BBTB2. Make sure you check out their sites.

This is an A2 (5.5 inch x 4.25 inch) card. I used my new Tim Holtz Ideology paper and shabby paper too. I used the Potpourri Basket cartridge for the trees. I welded the trees together on my Gypsy. I also used the DAD from Beyond Birthdays. I used Stampin' Up spots - close to cocoa and inked everything in true Jeannie fashion. Once I had the fish inked and on their shadow I poked a small hole in the mouth of each fish and strung them on the clamp. Anyhow, I liked how this turned out MUCH better - so thank you Jeannie and the rest of the ladies at BBTB2.
Enjoy!

Saturday, June 19, 2010

Run Shayne Run

My husband participated in the Forest Park Trail Run last summer and I finally scrapped his page.  I used my cricut - George to cut out the SuperStar and stars.  I mostly used my paper trimmer and crop-o-dile.  For the laces, I actually took his shoe laces and cut them!!!  LOL, look in the pics you can see that they are one in the same.  Don't work I went out and bought him new ones.  I punched holes in the paper and simply laced the paper.  I also added some eyelets around the edge.  I used the map and his number from the race as well.  I've always loved incorporating other items into my scrapbook page.  Those things you don't want to throw out - but sort of say to yourself "What the heck will I do with this?"  Put it into a page, it's not just about the pictures!  It's the memory the event leaves behind.  Visuals, such as the map and running number, help you recall those special times.
Enjoy!

Friday, June 18, 2010

Hard Work...Paid Off - Strawberry Delight

Wow, it has been one crazy week and I've fallen behind on my cards and crafting.  I've been sort of working on this card all week and it proved to be a challenge.  I had this great strawberry paper that I used, but it's hard to tell what it is...but it didn't look good any other way.  Also, I had the idea for the ribbon and just couldn't figure out how to get it right.  I used Indie Art for the strawberry and Nursery Rhymes for the words.  The stamps are CTMH and are part of a challenge on the cricut board.  The paper - is cosmo cricut and just some basics from my own stash.  I used a zag glue pen and then glittered in spots.  I looped the ribbon and laid this first then added the layers.  I doodled with my white jelly roll pen and a black pen.  I have the G file if you are interested.  Also, if you'd like more details in my blog - sizes and such.  Please leave me a comment.  I would be happy to if someone wants it!  Just email at melissaforquer@gmail.com
Enjoy - make sure to leave a comment I just love them!

Tuesday, June 15, 2010

A Flower for Everytime I think of You!

I made this simple wall hanging for my husband who is wonderful.  I have to be honest here and say that he is a true partner.  He helps with everything and takes wonderful care of the kiddos.  If it weren't for him, I wouldn't have time to craft and enjoy my time crafting.  This project was simple - the most difficult part was finding 12 x 24 paper.  In the end I didn't - and just went with the largest printer paper I could find.  I used the cricut markers to write the saying.  I also used Walk In My Garden cricut cartridge for the flowers.  This is simple - I didn't have Design Studio or my Gypsy at the time so I just cut a few flowers at the same size and made their layers....easy peasy! 
So to my sweet sweet husband - I love you and thank you for all you do.  You truly are an amazing man. 
I also submitted this to My Sheri Crafts for their altered item challenge!  Check it out!
Melissa

Monday, June 14, 2010

Sunshine on my shoulders

Here is a card I made for the Jitterbuggin' Challenge.  The rules were use complimentary colors - I chose purple/yellow.  Use a cricut flower - I used the sunflower border cut from Walk In My Garden.  Lastly, follow the sketch and add a ribbon (creme and brown spotted).  I also inked all edges in Stampin Ups Close to Cocoa.  The paper is basic grey and Stampin' Up.  I should add that I learned a little something about basic grey paper and my Cricut - I have much better luck if I turn the pressure down to a three.  Otherwise, the paper tears a bit.  Here's my take on the sketch - the importance of the card though is the sentiment for me.  I used to listen to John Denver when I was a child.  My mom had a number of his records and I just loved to sing and dance to these while home with mom during the summer.  It's a great childhood memory - so when I found this saying, the rest just fell into place.  I did this on my Gypsy - so if you would like the file, let me know - melissaforquer@gmail.com.  Don't forget to check out the Jitterbuggin' Challenge - join in, and when she gets a 100 followers someone will win a prize.  I also entered this into Pollycraft's Challenge - check it out.

Party Party Party

As promised here is all the fun party things from Anna's party.  Her step grandpa made her an amazing birthday cake!  I will post pics of that too when I get them on my computer.  Her theme was turtle oddly enough and she insisted on pink and green.  It was a good theme overall with a pool party I thought!  The few things I made for the party were embellished with turtles from the Create A Critter cart.  I cut out a bunch of little guys some with party hats and others without.  I glued them to crayon boxes for each attendee.  I also stenciled a little turtle to the gift bags - now this the funny part.  We got these little gift bags from our local craft store but I know they have them at the dollar store too.  My husband insisted to me that I could iron on them - but you know, they had this plasticy feel to them and said "are you sure".  He asured me, oh yes the sign said you could.  So, I had to take his word for it - yeah let's just say my iron is pink on the bottom now.  So I cut the stencil out of wax paper anyhow, layed it down and stenciled without it being stuck to the bags.  I worked, but the turtles didn't have a textured shell.  I also took clear plastic plates and glued little turtles on the underside of the plates.  I used Tombo Aqua glue and smeared them on the turtles tops and stuck them to the plates - easy I'd say, but if I'd do this again I would used a completely flat image because the layers on the turtle were harder to glue down.  Enjoy!

Sunday, June 13, 2010

Happy Birthday Anna - A Party Seal

Now for a few party items.  I'll start out with Anna's birthday card.  Since CAC is her favorite cart I decided to make the seal.  It was rather simple on my Gypsy.  I made the seal shadow as big as I could on a 12 x12 mat for TWO of the images.  I copied one and flipped the image so that I could put them back to back so to speak.  I then welded those images.  I then added the birthday hat from Celebration (again use the shadow image)  Next, i cut out the under layer of the seal in a white, and the upper layer in a gray from my Vintage Shabby paper of Tim Holtz.  I also cut out the party hat shadow in a DCWV pink, and used a flowery pink for the hat and trimed  in white.  At this point I took all white pieces and glimmer misted those.  Assembled the pieces (not attaching any of the top part of the hat - to give it a 3D look) and added some googly eyes.  Let's just say that she LOVED the card and so did everyone else!  This is why I started crafting in the first place - to save memories and make things special for my kids.  Hope you like!!  Also, any card that is done on my Gypsy I'm more then happy to give you the file...just email me at melissaforquer@gmail.com
Thanks and enjoy
Also, more party stuff to follow

AnnaMade - The Lion

My 7 year old LOVES Create A Critter.  So in honor of her birthday she made a lion that I promised to post on my blog.  Here it is!  Isn't it perfect - she did such a great job.  She picked out the papers and the image from CAC.  We cut him as large as possible on the Expression.  She colored some parts with crayons and colored pencils.  Also, she added a little bow to the mane and of course a blingy little crown!  Enjoy

Sand and Surf

This is an entry for the cuttlebug spot!  They provided a cute sketch to inspire!
Oh Oh OH!!! I got some new Tim Holtz paper today at my local craft store!!  I could NOT believe they had it as they haven't carried any of his paper!  I picked up two pads - for this card I used the stack called Vintage Shabby.  I love this paper and the blues just reminded me of the ocean.  So I used my cuttlebug and divine swirls to emboss the bottom layer.  I also used this FREE little girl stamp from Sliekje digi Stamps.  She looks a bit sassy and reminded me of my 6 - soon to be 7 - year old.  We are planning a beach trip this summer and this card with the amazing paper just happened.  I didn't use my Cricut for this which is a bit suprising as I usually always use that Big Bug.  I hope you like this card.  Oh, and remember to check back tomorrow - my daughter's birthday party is tomorrow and I made lots of little things for the celebration!  Have a great weekend and remember to join my blog and leave comments!!! 

Saturday, June 12, 2010

Summer Love

I made this card for the BBTB2 Challenge.  The rules were simple: use your cricut, use a stamp and think summer.  I downloaded this free stamp from Sliekje digi Stamps.  Isn't he just the cutest?  I fell in love with him and couldn't believe they were giving him away.  Anyhow, my first thought was a summer garden filled with wild flowers and grass.  He was colored using the magic colored pencil technique.  All patterned paper is basic grey.  The card itself is a 4 1/16" x 9 5/16".    Cartridges used:  Walk in My Garden, Hannah Montana, Gypsy Wanderings, Give A Hoot, and Paper Doll Dress Up.  I simply streched the layers of grass in my Gypsy and layered them.  Outer grass layer is popped with pop dots.  The butterflys were layered twice with the shadow in two different shades and only the body was attached to the shadows.  I then bent the wings upward.  Inked edges were done with Stampin' Ups Chocolate Chip.  I love how this turned out!!!
Enjoy - and please leave comments!  Also, if you are enjoying my blog please follow!
HUGS

Friday, June 11, 2010

Casino Night

I make my aunt a lovely little card, and what does my mom - her sister want to give her??? A slot machine card!!! LOL - so here you go mom, hope she likes. Actually, her present is a girls night out at a casino! I hope they're lucky!

I used an A2 sized card. On my Gypsy I welded three rectangles each a size 1.52 x 3.86 to a size 4.89 x 3.78 rectangle. Then I grouped the image and put another larger rectangle (5.35 x 4.13) around them - all welded. I also welded a group of ovals together for the coin border, popping out the larger ones with pop dots. All of those images were directly from George and Basic Shapes. The lemon and cherries are from Paisly and the seven is from the Hannah Montana cart. As you can tell I added lots of Stickles to make this a very BLINGY card. Perfect for a casino night - don't you think? Have fun mom and aunty - win big!
Thanks for looking!

Tuesday, June 8, 2010

Happy Birthday and God Bless


I used my new Stampin' Up paper for this card and I love the paper...it's so cute! I also inked the edges with Stampin' Ups ink spots and a make-up sponge. A very quick and easy card. Enjoy!

Monday, June 7, 2010

Turtle Birthday - PrismaColored Pencils and Baby Oil


This is my first attempt at the Magic colored pencil technique. I tried a number of things that others suggested. I tried Staz On - which for whatever reason did NOT look good as a stamp - it was really spread out. Then I tried Versafine - love this stamp ink - images are so well defined and also Stampn' Up's inks. I used Georgia Pacific paper b/c it was available. I used baby oil and mineral spirits both and the prismacolor premier colored pencils.
This was such a FUN technique. In the end for this particular card I chose baby oil and the Stampin' Up pad - Chocolate Chip.
Important Links Used:
Free Digi Stamps
Magic Pencil Tutorial

Sunday, June 6, 2010

Just Swinging By


Hi all - here is my new card. I am again entering the Jitterbuggin' Challenge. Sherri came up with another great sketch. The rules were simple, follow the sketch - use a monkey cut-out on the cricut - and use three patterned papers! Here's my interpretation. Also, I used Jeannie Phillips make-up sponge technique for applying my inked edges - WHAT A HUGE DIFFERENCE IT MAKES!!!! Click on any name mentioned here and it will take you to the link I've mentioned! Happy Crafting!

Wednesday, June 2, 2010

Thank You Notes and Matching Box


I started this project for my mom. I'm making 10 thank you notes for her to give at her New Grandma Party (added the pic of the invites too - thinking about changing the brown paper on the invites to the same on the box) she is hosting. This was a fun project and I think the results are pretty darn cute! I used Tags, Bags, Boxes and More for the drawer part of the match box (match2 - pg 124). I cut the drawer at 8.37" x 7.02" on my Expressions using my Gypsy. This will fit A2 envelopes perfect. One thing I didn't like about this cut was the sides were higher then the front and back of the drawer. I'm sure there is an important purpose for this..but for me, I wanted them all to be equal. So before glueing the corners I trimed the heighth from those edges. For the sleeve of the box - I simply cut a piece of cardstock at the appropriate length and scored using my scorer. Simply lay the drawer piece on top of the cardstock and make a mark, score, then make the next mark all the way around. Leave yourself some slack. I can give some precise measurements here if needed. Just post a comment or PM me on the cricut board for detailed instructions for the A2 sleeve.
The Sentiment is from WildCard. I liked the idea of having a ribbon go all the way around that could be untied. I also added a bit of ribbon through the hole on the drawer so it would actually work.

What I learned:
That if you measure just for the card your box won't fit for your envelope!!! So my first box was a bit whimpy!!! Also, were's the sleeve for this matchbox drawer - no idea but the one I made on my own worked perfect!!!