Friday, October 29, 2010

Trick or Treating with Tiddly Inks and Simply Betty Stamps

Hi Ya Everyone - so excited about the blog hop today - here is what Christy and Betty want you to know about the hop:

"Welcome to the collision of Tiddly Inks and Simply Betty Stamps. :) One fun, fun, fun blog hop and crash 'em up! Betty (of Simply Betty Stamps) and I are big Halloween fans, so naturally we had to put together a fun Trick or Treat Blog Hop....Boo!


How to Participate: Post your creation (which I hope you already created) on your personal blog today between 12:00 PM CST (noon) and 5:55 PM CST. The title of your post should be "Trick or Treating with Tiddly Inks and Simply Betty Stamps." If possible, your post is to include a Trick (a technique) or a Treat (a gorgeous card :D).

Once your blog post is completed, visit the Simply Betty Stamps blog and link your exact URL in the Inlinkz list at the bottom of the her post in order to be qualified for the prizes. There is no need to sign up in advance, but the Inlinkz list will close at 6:00 PM CST. Then we hop, Halloween style, from the Simply Betty Stamps blog. If you don't plan to enter a card, still come along and comment. :) Everyone would appreciate it and you might get super inspired---or spooked. :)

Prizes: Two blogger participant winners will be announced November 5 and highlighted on the hosting blogs, Tiddly Inks and Simply Betty Stamps. Both winners will receive a $10 gift voucher from Tiddly Inks and digital images of her choice from Simply Betty Stamps.

Many of the design team members are offering freebies and prizes along the way, so even if you don't plan on entering a card, come along and find all the tricks and treats."

Now, on to my creation - well creations!  I made two cards - and because I couldn't decide which I liked better I decided I would post two.  Now, I'm offering a treat on my hop - because I'm out of tricks - LOL.  Anyhow, I am going to purchase two digital stamps of my winners choice - Your choice of one from Simply Betty and a choice from Tiddly Inks.  I love Chirsty's stamps as you know and am starting to fall in love with Betty's too!  So I would like to share this love with you.  All you have to do is leave me a comment here and tell me what card of mine you like better! 
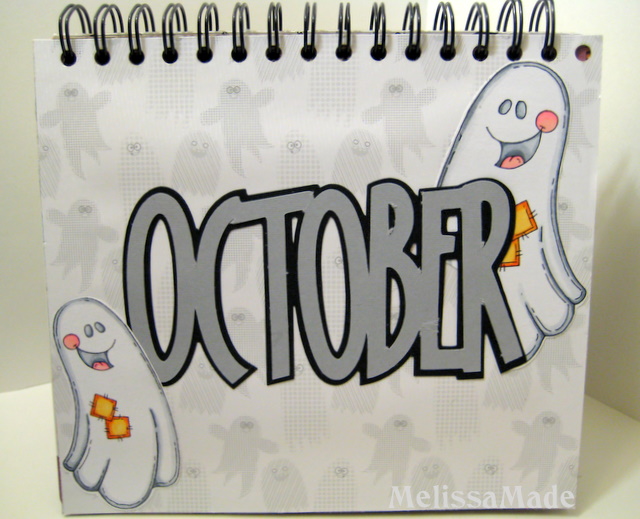
For my card I made a standard easel card for both.  Colored Betty Witch Digi in Copics and fussy cut her.
Card 2

For the orange colored card I used a paper that had a little haunted house in it and cut it out.  I also cut out some transparency in a rectangle and with my Gypsy made a little window frame.  I also altered a bird from Straight from the Nest by flipping it's wing upside down and using that as a larger beak to make a crow.  I layered all of this and popped Betty out from the background.

For my second card I used the cartridge MiniMonsters and cut out the Haunted House.  I adhered all the pieces and glittered some portions to look spider web covered.  I then popped Betty from the page. 

Finally, I pulled some wire out of one of my wired ribbons and threaded some cut out bats on the wire and adhered that to the card.  Oh, I also computer generated my sentiment and cut that out with my nestables.

Thanks for looking and joining in on the fun - I can't wait to see your creations! So please join in the fun.  Here's the hop order and if you get lost simply go back to Tiddly Inks or Simply Betty! 

Below is the list of the design team members for both companies if you want to start with a few blogs and see some amazing cards----and maybe find some goodies along the way. The rest of the participants are on the inlinkz list on Betty's blog and you can find those starting tonight at 6 PM CST....please come back then to see other the entries. And also be sure to come back on November 5 when we will be featuring 2 participant bloggers. So much fun for days and days...:)


Now don't forget to read the directions posted above carefull!!!  Also, leave a comment on which card you like better here and at the end of the hop I will be choosing a person to receive one Tiddly Ink stamp of choice and one Simply Betty Stamp of Choice!!!

Enjoy!!!

Aware - Paper Cutz Challenge


Hi Ya Everyone!
  My aunts are breast cancer survivors.  My mother has three sisters and each one has had breast cancer.  My mom has been lucky enough to dodge cancer.  My aunt that I feel closest too had it the worst and had radiation.  She has been cancer free for a number of years now and I feel so lucky to have her in my life.  I thought of her when I made this card - which led me to think of all the women who deal and have dealt with this at some point, either by having cancer or dealing with a loved one that is fighting or surviving or dieing.  Awareness is such an important part of this disease.  All women should understand what being aware of your body can mean.  Knowledge is so very powerful.  So this week at Paper Cutz Challenge Mary has asked each of us to make a card for Breast Cancer Awareness.


I chose this beautiful image from Tiddly Inks - Dare To Be Aware.  Isn't she gorgeous?  For some reason this image spoke volumes.  Cancer, radiation, chemotherapy ravage women - often making those that go through it feel ugly and weak.  Truly though - they become more beautiful - strong - and inspiring and for me, this image represented that in some way.  Christy at Tiddly Inks also has this fabulous Hope ribbon border and  Hope ribbon background paper.  I chose to use them all - what could be better then lots of pinks and reds with glitter!  Oh so girly and perfect.  I first layered the ribbon border on the side of the stamp and then I colored Dare to be Aware with my Copics and used stickles to highlight the ribbon around her waste.  I fussy cut the side of her but left the other side square.  I layered a deep maroon paper behind her to bring out the image a bit more against the ribbon paper.

 I also cut out the letters Aware from Nursery Rhymes in black paper and stickled them.  Isn't being aware beautiful???  Finally, I added this crinkle ribbon with a one word charm - unity.  I think that is what breast cancer has done for women - we have united to be support for one another - perhaps the silver lining.  Thanks everyone for checking out my card - head on over to Paper Cutz and show your support for the cause by creating a card of your own!!! 
Enjoy!

Thursday, October 28, 2010

Light Your Way - Meljen's Designs Challenge

Hi Ya Everyone,
  This week at Meljen's Designs Challenge we are asking everyone to use two images on your projects.  This is so easy to do with Meljen's stamps because Melissa Jenkins (the artist) has created so many lovely sentiments and stamps that can coordinate.  Also, there are so many freebies, so make sure to play!
I also used the sketch over at Truly Scrumptious this week:

 Meljen's is sponsoring - so why not go two for one and play in both challenges.  Isn't this sketch too cute?  I loved it and wanted to find some amazing papers to go with the images I chose.  The first image is little lighthouse and the second and one of my favorites is sail away which can be purchased at Whimsy here.  I layered them in photoshop and colored with Copics. 

After coloring I set the image aside and chose some wonderful papers from Basic Gray Capella and a few others (sorry don't have names).  I first attached my squares at the desired measurements and then used my nestable to cut through them.  I then layered the Meljen's image underneath. 

Lastly, I added some of my favorite crinkle ribbon and this cute little charm I had in my stash.  A pretty easy card really - but so much fun.  Don't forget to check out the new release at Whimsy today - here's a peek!!


Enjoy!

Wednesday, October 27, 2010

Autumn - Crafty Creations Challenge

Hi Ya Everyone!
  Today, I went simple - but I LOVE the way this card turned out.  This week at Crafty Creations we are challenging you all to make a Halloween/Fall card!  Now, this should be easy - the sky's the limit so to speak!  Any colors, any images, anything!!!  So create and enter - you could win some sweet bling and felt ribbon!
Ok, my card.  All cricut baby!  No Copics - can you believe it???  I used my new Straight From the Nest cartridge - Love it.  These little trees totally jumped off the booklet page and told me I had to make fall trees with them! LOL.  I have this great paper from Basic Grey fall stack that is perfect - there are actually little fall trees in the background.  I cut each tree the same size with the shadow and all layers using my Gypsy.  I simply adhered them to the shadow which I cut in a creamy white from the same stack. 

I also chose the Autumn cut from Stretch Your Imagination and cut the three layers (shadow, regular and outline) in white, orange and brown.  I popped the front tree off of the card while leaving the other three attached.  Finally, I topped this card off with a maroon and brown crinkle ribbon from Prairie Bird Boutique.  Love this little simple card - please join in the fun at Crafty Creations this week!
Enjoy!

Tuesday, October 26, 2010

Doughnut Feel Like Fall? - Tiddly Inks Challenge

Hi ya everyone!
  This week at Tiddly Inks we are creating Fall Spinner Cards!  Ok, had heard of them but never saw one in action until Christy shared this video/tutorial with us: http://tiddlyinkschallenge.blogspot.com/2010/05/bettys-alien-spinner-card-tutorial.html
I couldn't wait to try this myself but had to find the perfect Tiddly Ink image for a card like this!  Well, let's be honest - all the Tiddly Ink Images are perfect for any card! LOL - but I settled on Donut Ya Know - Lilly Bean I thought it would be fun to see her spin around on that big doughnut.  I colored her with my Copics and then stickled the doughnut and cut her out with my Circle Nestables.  I set her aside to dry.

The problem however, was how could I turn this into a fall card.  So, I recruited hubby's help - he's clever with the puns doughnut you know? LOL  Anyhow, enough silly stuff and on to the card.

  I followed the tutorial but decided to make my card a 5x7.  So I just adjusted the dimensions but keeping the slot that the pennies go in at a 1/2 inch.  I used some Stampin' Up paper for the spinner contraption part, but had this beautiful pumpkin paper I thought would be fun.  I computer generated the sentiment.  In the end I decided to make a raffia bow with a button.  It still needed a little something so I added a strip of green bling to match Lilly Beans shirt!  Oh my gosh - now to watch it spin - my daughter LOVED this card - so I snuck it in her lunch with a little note!


Thanks for checking out my spinner card.  Head on over to the Tiddly Inks Challenge blog and join in on the fun!
Enjoy!

Monday, October 25, 2010

Tiddly Inks and Simply Betty Blog Hop

Hi ya Everyone!
 Make sure to participate in the blog hop starting this week.  Click on this link for all the details!  Can't wait to share with you my project - you get to make a project too!  Stay tuned!!!

Friday, October 22, 2010

BOO! - Paper Cutz Challenge!

Hi Ya Everyone!
  This week at Paper Cutz we would like to see you use some shapes - circles, stars, and, diamonds/crescents!  I had a bit of a hard time deciding what to do here - I thought wow that's a lot of shapes - but I went ahead and took a circle, star and crescent and welded the shadow of these shapes together on my Gypsy.  Instantly I thought candy bar wrapper!

 Don't ask me why - maybe because I'm always thinking about candy! LOL - anyhow, I then layered the word BOO! from Simply Charmed along with a grave stone and a little ghost from the same cart! This cartridge is so fun - reminds me a bit of Doodle Charms but the images are just too sweet.  Look at the face in BOO - isn't that adorable? 

I used a number of fun papers on the project - papers from Memory Makers Halloween.  I laid the star and circle flat then popped the crescent moon.  I also popped up the Boo.  The head stone was layered and place flat and the little ghost was popped up!  Finally, I added some crumpled ribbon - I am in LOVE with this ribbon - it looks beautiful no matter how you put it on! 

Although, I don't really want to tell you where I got it - because I know everyone is going to start buying from her and she'll have to increase her prices - BUT, (BIG SIGH) I guess I will share - Prairie Bird Boutique - ONLY $5 for a bundle of three colors!  It's gorgeous - my friend Nicole at Gotta Have Paper filled me in on the secret and My Craft Spot (who also sells the ribbon) has a great tutorial  on how to tie beautiful bows.  Now, don't forget to join in on the fun at Paper Cutz!!!
Enjoy!

Thursday, October 21, 2010

Wrapped In Love - Meljen's Challenge Anything Goes!!


Hi Ya Everyone!
  Back again with a new challenge and release from Meljen's Designs.  First, here's the awesome release.  I absolutely love this set of stamps!  Melissa has gone beyond adorable here for Halloween!  Ok, Ok, I'll shut up and just show you!


Aren't they too cute - go to Whimsy and get them for yourselves!  You can find all of Meljen's other stamps too - and don't forget she has a rubber line you can order now!  I decided to use mummy bear for this card.


First, I took a 5x5 inch card base and cut a 4.75 x 4.75 inch square from my Capella basic grey to wrap some sheer ribbon around.  Next, I printed out my mummy bear and colored him with Copics.  I only used the warm grey tones so he would match my paper.  The bear was cut with my circle nestables and then mounted on a tan piece of card stock.  I also mounted the basic grey on the same card stock.  Last, I blew up the stars on the bear and printed them on the brown paper and cut those.  Some are popped and others are adhered flat. 


Thanks for looking and don't forget to head over to Meljen's challenge blog to play!! Anything Goes - so there's no reason to not join in on the fun!
Enjoy!

Wednesday, October 20, 2010

The Golden Colors of Fall - Crafty Creations Challenge #90


Hi Ya Everyone,
  This week at Crafty Creations we are challenging you to use three colors on your card - brown, red and green.  You are not limited to these colors, but they must be present on your card.  Stitchy Bear Stamps is sponsoring and you could win 5 digital stamps from them. 


I made this little tag card for a change of pace.  I started coloring (with Copics) this adorable image from our sponsor and wanted it to stand alone. 


So I decided to put her on a tag.  I cut her out with my X-Large nestables and adhered her to a piece of brown paper.  I made a pocket using some Basic Grey Cappela paper I had in my stash and used a number of rub-ons from Karen Foster Designs.


 I added a bit of ribbon for the top of the tag.  Here comes a wee mistake on my part - I also tried adding a sentiment from the rub-on set that said "The Golden Days of Fall" - however, it didn't show up as well as I thought - so if you look closely (under the buttons that is) you will see a little something peeking out! LOL - oh well live and learn!!  Thanks so much for stopping by!  Be sure to check out our sponsor for this week Stitchy Bear and head over to Crafty Creations for a fun easy challenge!
Enjoy!

Tuesday, October 19, 2010

Tea and Chocolate - Tiddly Inks Challenge #26

Hi Ya everyone,
  This is my first week as a Tiddly Inker and I'm so excited to share my project with you.  But first, make sure to participate this week in the challenge at the Tiddly Ink Challenge Blog - it's a perfect one for this time of year.  You have to create something that holds candy, be it box, bag, or anything else to put candy in.  Make sure to use a Tiddly Ink image to win the prize.  Christy is awesome enough to give freebies to if you are a member of Paper Craft Planet and she has a few freebies here
Now, on to my project.  I wanted to make my daughter's teacher a little candy holder for her birthday that's at the end of this month.  She mentioned to the class that she LOVES chocolate.  I got her a bag of Lindt's Chocolate Truffles in the blue bag - oh yum! 

I also added an assortment of tea's, because what goes better with tea than chocolate?!  I got this awesome paper from my local scrapping store (LSS) from Studio 45!! I love the Alice In Wonderland theme!  It inspired me to use these adorable images from Tiddly Inks - The Chesire Cat, Alice (Time For Tea) and The Mad Hatter (Mad For You).  I used my Copics to color the images and fussy cut them.


 I set them aside and measured my candy bag.  You can do this for any bag, I made the width of my paper at 1/2 inch larger then the candy bag itself.  I cut two strips at that width from the paper.  I adhered them together and made score marks where the paper would fit right around the seems of the bag.  Then, I simply adhered using my ATG in the appropriate places.  Once the paper was around the bag, I punched two holes straight through and ran three matching ribbons through and tied a bow.  I also cut out one of the cards from the paper and mounted it on black card stock.  On the back I placed a small sheet for a sentiment and wrote - What goes better with tea than chocolate and ran my ribbon through.  I LOVE how this project turned out.  Thanks for stopping by my blog and leaving comments - I so appreciate them!  Don't forget to stop by the Tiddly Inks Challenge blog and play along!!
Enjoy!

Monday, October 18, 2010

Good Boy


Hi ya everyone -   I'm thrilled to be visiting Sheila again at She's A Sassy Lady for another tutorial.  Today, I want to share with you a project I put together for a friend who just moved into her very first apartment alone and got her very first puppy!  I was so happy for her to have found some new freedom that I had to put a little something together for her. 

This project has a feature that I've been doing for awhile and that's picture matting.  I've made a number of these for friends and as scrapbook pages and really love the technique and wanted to pass it on to you.  This is a little different from my normal matting because without a frame I wanted the bottom circle to show on the outside.  This might sound a bit complicated but really it's very easy to do with a Gypsy, Design Studio or Sure Cuts A Lot.  You will need to start with two layers.  I typically label them Bottom and Top  to keep myself straight (bottom refers to the bottom matting piece and top refers to the top - clever huh?).  So, in this tutorial I speak in terms of the bottom layer and the top layer.  I will also talk a lot about shadow and regular in terms of shapes and fonts.  One important thing to remember - the shadow goes on the TOP layer ALWAYS!  The regular always goes on the BOTTOM layer
First, I chose a really cute paper and a good matching background paper. I also bought a cork board from my local scrapbook store and some cute tacs in the shape of dogs and bones.

The top layer would be my patterned paper and the bottom is my turquoise paper.  I pulled out my Gypsy and started with two layers: Top and Bottom.  I made the largest circle possible for a 12 x 12 sheet of card stock from George and Basic Shapes and placed that on my Bottom layer.  For my top layer, I made another circle a quarter of an inch smaller then the bottom circle so you could see the turquoise edge on the outside.  This is the only time in which the top layer will contain a smaller image then the bottom layer.  Now, on my Gypsy I left both layers open (little eye open on the layer tab) so I could see both layers together.  I lined up the large circle and the small circle so that the smaller circle (top layer) was visible inside the larger circle (bottom layer). 

Next, I started working with just the bottom layer - remember using regular cuts.  I chose two rounded edge squares from George and placed them in my circle.  Next, I chose the regular font from Nursery Rhymes and  wrote out Good Boy.  I also chose a regular shaped bone from Potpourri basket.  I arranged  the letters the bone and the squares exactly how I wanted them and then moved to the top layer.  With the top layer I used all shadow cuts.  Again, I chose the shadow rounded edge squares, the shadow for the bone and shadow font and placed them on my top layer over the images on the bottom layer (remember I can see the bottom layer because I left the little eye open).  This is what it looks like together:


Finally, I cut both layers out on my Expressions and layered them together. 

I saved all the pieces - when you have writing on a layer like this you need to keep all the center pieces for your words.   


Once the two sheets were layered and adhered down, I used my sticker maker to adhere the insides of the letters. 

I also, painted the edge b/c it only came in lime green.  I took some white acrylic paint and put two layers on with a simple paintbrush. 

I also made a little card to go with using a Tiddly Ink's image. 


The little bone opens up to reveal a message.

Thanks for stopping by and head on over to She's A Sassy Lady for more amazing tutorials!!  Don't forget to leave your comments or ask questions!

Melissa


Sunday, October 17, 2010

October Calendar Page

Hi ya everyone!
  Just a quick post - if you remember my Meljen's Calendar from the blog hop?- I added a few cute images from Meljen's to the page - meet Patchy Ghost!!  You can find him at Whimsy Stamps!

I colored the both of them with my Copics and cut them out and placed them on my October calendar page.  The October was from Designers Calendar!  Thanks for looking - have a wonderful weekend!
Enjoy!