Showing posts with label Cindy Loo. Show all posts

Wednesday, August 3, 2011

You're The Sweetest - Creative Critterz Imaginations

Hi ya everyone!  Today is my day at the Creative Critterz Imaginations blog and I'll be sharing a very cute critter card I made.
  Today I want to share with you a quick card I created using the Imagine and the Gypsy.  I love using these two products together.  I began with the following items:
In addition to these items:
Imagine
White 12 x 12 sheets of paper
Pearl Embellishments colored with R20 Copic
Pink Satin Ribbon
 After cutting and printing each piece on the Imagine and adding some simple embellishments, I adhered the layers for this final product.
If you have any questions or comments I would love to hear from you!

Friday, April 1, 2011

Happy Anniversary Meljen's - and a SALE

Hi ya everyone!!!
  We are having a blog hop at Meljen's Designs to celebrate a whole awesome year of Meljen's Stamps - that's right it's Melissa's one year anniversary!!  Woo HOO - you know what that means you have a chance to win three free images of your choice - and three winners will be chosen!  In order to qualify you have to leave comments on each post throughout the hop.  Aside from prizes that will be chosen on Monday on the Meljen's Design Blog you will get inspired by some of these AWESOME creations from the Design Team.  The best part is you will see images of Melissa's that you might have forgotten about or not have seen if you recently just started checking out the Meljen's Design store!
You should have come here from the FABULOUS Marlena's blog!  Wasn't her project Gorgeous!! Marlena can work a Copic for sure!  Now, for my project I chose three separate images.  That's one of the coolest things about Meljen's digis - they can coordinate.  Here you will see what three separate images can look like together!
 I initially used my Gypsy and Expressions to cut out a base for my card.  Since my images I chose included mushrooms I decided it would be really cute to have a mushroom based card.  I used the cartridge from Cindy Loo and welded three mushroom shadows together flipping the middle image to give some variety.  I did a lot of measuring so that I had a 5x7 card in the end.
 Next, I colored my images (click on image for store location): Toadstool Buggies, Mushroom Mouse, and Garden Bird House with my Copics.  I chose bright colors to give my card a spring feel.  Working around the mushrooms and the bright red.
 Once the image was colored I used a jar and drew a circle about the size I needed around the image.  I then used my micro tipped scissors to cut it out.
 I did the same with a sheet of black cardstock for a background.  I assembled the card popping out images here and there.  I added some butterfly punches as well.

Now you should head to the bubbly and creative Nicole's Blog!  See what fabulousness she has cooked up for you!
NOW DON'T FORGET ABOUT THE SALE AT MELJEN'S SECTION AT THE WHIMSY STAMP SHOP - HERE!  CAN YOU BELIEVE ALL DIGITAL STAMPS ARE 50% OFF!!!!!!!!!!!!!!!!!!!!!!!!!!!!  YOU ONLY HAVE APRIL 1ST THROUGH THE 4TH!
HAPPY ANNIVERSARY MELJEN'S

Friday, November 26, 2010

Giving Thanks - Paper Cutz Challenge

Hi everyone,
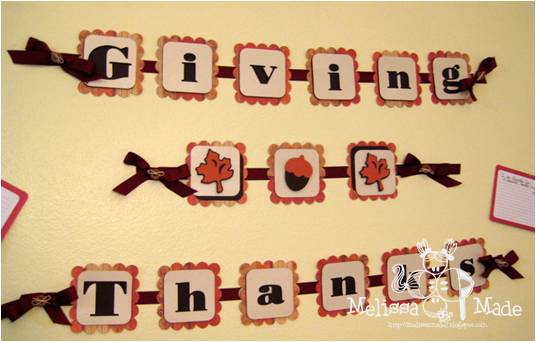
  Anything goes at Paper Cutz this week - which was a blessing because I really wanted to make this for my house and my husband and I liked the idea of a new Thanksgiving Day tradition.  I made a banner using my Gypsy, MiniMonograms and Cindy Loo font, an Acorn from Create A Critters and a maple leaf from Gypsy Wanderings.

  I chose the scalloped square and plain rounded square from MiniMonograms and used the font from Cindy Loo. 

This was inspired by Donna Mundingers Halloween banner found here.  Once I had the blocks and letters cut out I popped the top layer off the bottom.  I then used my ATG tape roller and taped all blocks to a maroon ribbon.  I then tied bows with buttons looped with hemp twine and used a glue dot to stick them to the edge ribbons. 

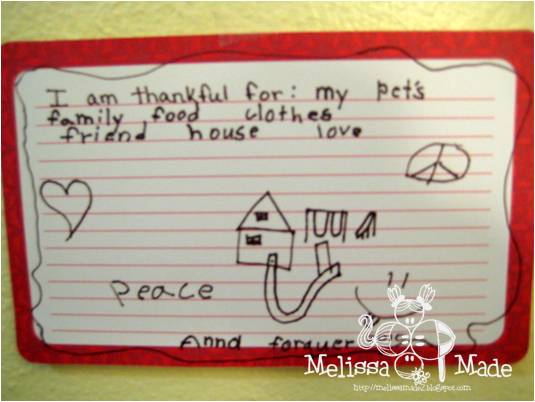
Finally, I found some recipe cards at Michaels for one dollar a set (20 cards).  I wrote at the top - I'm thankful for:  and each guest wrote what they were thankful for and hung it to the wall. 

We will keep these and each year hang them up on the wall and ask our new guests to write what they are thankful for.  This will allow us to remember our Thanksgivings and when hubby and I are old and gray we will have a number of cards to read and reminisce. 
Hope your bellies have recovered!!! Mine is starting too!  Don't forget to link your project over at Paper Cutz - there's no reason not too - it's anything goes!!!
Enjoy!

Thursday, November 4, 2010

Just a sittin' on my pumpkin - Meljen's Design Challenge

Hi ya everyone!
  Whew, I've been a busy girl these last few days...but I managed to put together this cute card using the new Meljen's Design release!  Here they are:

Don't you just love Thursdays???  I do because we get to show you the new releases and as always Melissa does not disappoint - I think her images are just adorable and I always have the hardest time deciding which one to use first!  You can find all her new releases and her previous released stamps here at Whimsy Stamps.  This time I chose the new Country Scarecrow and the Country Star Pumpkin.  First, I colored  the scarecrow with Copics and paper pieced the pumpkin using some Stampin' Up paper (sorry can't remember the name). 

On my Gypsy I cut out a scalloped circle card and a circle in the stampin' up paper from Cindy Loo.  I fussy cut the scarecrow and sat him up on the pumpkin using pop dots.  Finally I added a bit of raffia to the top of the card.  Love the way this little card turned out - OH and you might ask - ok, what's the challenge here!!!  It's to show three shapes on your card - mine is the circle, star and heart. 

So join the fun at Meljen's this week and enter your card with three shapes.  Can't wait to see what you make.  Also, check out the new freebie that was release this week - it's a great fall freebie!
Enjoy!

Tuesday, August 24, 2010

Fairy Bookmark

Hey everyone!
  I'm back with more Tiddly Inks - I think I might need an intervention!  I will enter this into this week's Stamptacular Sunday Challenge as well - you have to use two stamped images.
I'm sure you are tired of hearing me say this but I LOVE reading and so many of the times I give books as presents.  Well, my daughter had a birthday to go to and the little girl she is best friends with reads all the time!  I just love this - so we got her a book and a gift card to a book store.  Now, we had to make her a bookmark to go with it - and she just finished a series with fairy's.  So, what better to use the new Tiddly Ink fairies for a bookmark.  I colored the fairies with Copics and then just fussy cut (I just learned that this type of cutting had a name - thanks to Donna over at Popsicle Toes!)  them out. 

Next, I got out the Gypsy - which never has any time to collect dust - and cut out a bookmark from an old cereal box.  I collect all my cereal boxes as we go through a lot.  Our go to snack is usually cereal - so I have a lot of boxes - LOL!  Anyhow, I used Tags, Bags, Boxes and More and chose the shadow of a rounded bookmark for this one.  I used the multi cut 3 times - I don't have a deep cut blade and housing but three times worked like a charm.  I then cut out two more shadow cuts in a simple navy color and a normal cut from a stars and moons paper I got awhile ago.  I also cut out three shadow stars from George and two shadow swirls from Cindy Loo in navy.  Lastly, I cut out the top layers to the stars and swirls in a basic yellow.  Before layering any of the paper on the cardboard cereal box, I inked the edges in Nearly Navy from Stampin' Up - I didn't want the cardboard to show on the sides and this worked beautifully.  I then put down my navy paper on both sides and layered the star and moon paper on one side.  I added the swirls and layered the fairies over the top.  Lastly, I added the stars.  I punched a whole in the top and put a sheer yellow, blue and white ribbon through.  I loved the look but felt like something was missing.  STICKLES!!!  My go to bling for a bookmark - it typically won't rub off, it's not too bumpy for a bookmark but you still get that sparkle.
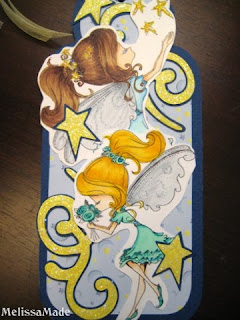
 I added it to all the yellow paper showing - stars and swirls.  Lastly, I added some to the fairies.  In the end, I love this book mark and will probably have to make one for my daughter too - and who am I kidding - I want one for myself!!! 
Enjoy!