Saturday, July 31, 2010

Summer Lovin' - Challenge #78 at Crafty Creations Challenges

Hi everyone,
  I found this GREAT challenge blog Crafty Creations Challenges the other day and decided to participate in the challenge.  Every week there are some great prizes to be had so be sure to enter your creations!  For this challenge all you have to do is enter something that's summery!  I decided to use this cute Meljens design digital stamp.  I love these stamps as a beginner can make them look beautiful as well as an expert!!  I colored this with my Copic markers first.  Applied a bit of zig glue and sprinkled with some fine glitter powder.  I used this yummy ice cream paper from American Crafts - Heat Wave; Slammin' Strawberry. 

All layers were popped from the one below it.  I also got this cute ribbon for one dollar tonight and just had to add it.  The brads were from a company that I don't have the packaging for anymore but I'm guessing it's also from American Crafts.  I also added a little doodle stitching to each layer for some color.  Finally, I added the sentiment using the letter beads!  Don't forget to stop by Crafty Creations and check out their cute blog and enter to win a wonderful prize!!!

Friday, July 30, 2010

A Thank You


Hi Everyone,
  I have a thank you to give to a great coworker who really did me a favor.  She's amazing - and I really appreciate what she did for me.  I decided to make her a little thank you bouquet.  I started with a peanut butter jar and washed it in the dish washer after removing the label.  I used brown vinyl (which I love by the way - this is my first time using it) and adhered a number of Thank Yous to the glass.  I used every thank you I could find on my cartridges! 

I filled the jar with m&m's and then used Stretch Your Imagination to make the birdhouse.  I was inspired by a card Jeannie Phillips did for the birdhouse with the branches - check her card out here.  I then cut out some birds on Create A Critter and Stretch your Imagination - and added everything to a straw or wooden rod.  Next, I took some pipe cleaners and twirled them around my fingers to also add. 

A quick project that I was able to finish in one night.  It also fits the criteria for the Fantabulous Cricut Challenge.  Make sure to check out their great site! 
Enjoy!

Thursday, July 29, 2010

Little Girl - Copics

Hey everyone!
I am so excited about my new Copic markers.  I've been using colored pencils to color my stamps but really wanted some Copics because of the vibrant colors!!!  So, I did it, I got a few markers...and ta-da. 

This is my very first go with them - I have so much to learn.  But I really wanted to show you what's been occupying my mind the past few days!  The image is from my favorite digital stamp company Tiddly Inks.  I made the flowers on my Cricut with the Cindy Loo cartridge.  Once I had the layers cut I inked the edges and then used a bit of glimmer mist to make them sparkle.  I used my crop-a-dile to put in the small brad. 

I had a stamp from a group of stamps about girls that I used - which seemed appropriate with this little girl.  Thanks for looking - and did I tell you that I LOVE COPICS!!!  Can't wait to get a few more to add to my collection!
Enjoy!

Monday, July 26, 2010

Under My Umbrella - Jitterbuggin'

Hey everyone,
  I made this card for the Jitterbuggin' Challenge this week!  Sherri's sketch was fabulous and the rules were as follows:  use black and white with one accent color - (mine was blue my favorite color), use a punch (I don't have any since I have my cricut but I did use a die for some squares so I hope that counts) and use your cricut while following the sketch.    I had been checking out the Frosted Designs website today too and thought I would combine the two for both challenges since their rules were to use a song lyric. 

Now, my friend Jill and I laughed so hard at the song "Umbrella" when we heard Rhianna sing it because she says "under my umbrella, ella, ella, ella, ella" and it's sort of annoying - no offense Rhianna if you ever check my website.  But we did like the sentiment of being good friends and always being there for each other.  So, Jill did some leg work and found this same song sung by Scott Simon - check it out, it is a much better version of the song!  This is how my sentiment came to be and why I'm also entering it into the Frosted Design challenge. 
  The card itself is a 6x6 cut on white card stock.  I also cut the black and white square at a 5 and 3/4.  The image of the child with the umbrella is from Nursery Rhymes.  He has a goose with him, but I cut that out - didn't think it fit.  I also used Indie Art for the rain drops and welded two shadows together for the layered raindrops.  The sentiment is computer generated.  Once I layered the images using Sherri's sketch I thought the card needed a little more.  I took some sparkly blue brads and added three to the corner of the child's image, and then added some sparkly Stickles to the rain drops and the drips on the umbrella. 

I love the effect of the blue on black and white...I think I'll send this to my friend Jill!!!
Enjoy!

Sunday, July 25, 2010

Christmas in July - Fantab. Cricut Challenge #19

Hey everyone,

Christmas - um, really??? I'm still sorting out summer - so thinking about Christmas was entirely too hard for me. But, Fantabulous Cricut challenge was to make a Christmas card. I decided to give it a whirl and came up with this little card. I love Christmas really and I love blue, silver and white. Most of my Christmas decorations are those colors and I think they look beautiful together. So I decided to go with that for this card. I wanted something that said cold since weather out there has been so hot.

I used Winter Woodland cartridge for this card. I used the snowflake on the scalloped square background. I cut just the scallop with the snowflake by hiding it on my Gypsy . I then welded the word snowy (shadow) to the shadow of the snowflake. I cut out a snowflake in a swirly white paper, and the word snowy in the same. I then took my cuttlebug and cut three sizzix snowflakes in a light blue. First, I adhered the blue scallop to a white card. I added the blue snowflakes next. I popped the word snowy welded to the snowflake. Then I took the extra snowflake I cut and used my nestables to cut a circle in the middle. I tied fishing line to a snowflake brad (I took the brad part off) I got and then hot glued it to the edge of the circle so that the snowflake looks like it's suspended in the circle. I then popped that snowflake up off the paper.


I like the effect, but if I had it to do over again, I would have three snowflakes popped up from the layer below. This would make that snowflake embellishment really look suspended.


Thanks for looking!


Enjoy!

Saturday, July 24, 2010

Trees - Tiddly Inks Challenge #14 Sketch it


Hey everyone,
The new challenge at Tiddly Inks for the week is to follow a sketch. I've been so excited to use this very cute Tiddly Inks stamp. I also wanted to use my new nestables from Spellbinders, so the sketch worked perfectly for using the circle cut. I used the largest circle and the next size down for the stamp and the outer green layer. Once I had colored the stamp with my colored pencils I printed another digital image on a piece of regular paper and trimmed it out carefully. I layed this over my colored image and took my Stampin' Up Creamy Caramel and sponged over the entire circle which left a nice creamy background with my stamp.


I set this aside cut a 4 3/4 x 4 3/4 piece of cream cardstock that I embossed with my cuttlebug folder birds and swirls on the right half of the cardstock. Next I inked in the same color the edge that was not embossed. I inked the circle the stamp is on and the green cardstock with the same color and layered those. Before adding the stamp I added a bit of burlap and some green hemp to my 5x5 card. Next I placed on my buttons and heart embellishment. I added a layer of these cute leaves from Prima Flowers and popped my stamped circle from the whole card.

I really enjoyed this earthy project. The sentiment was sort of different for me - I could not think of something that wasn't so obvious - so instead I just put a heart - because I do so love trees!!!
Enjoy!

Thursday, July 22, 2010

Tiddly Inks Blog Hop - Halloween in July!!!!

YAY!!! It's finally here!  I've been waiting and waiting for this blog hop because Halloween in one of my favorite times of year!  I love getting my kids dressed up and painting their faces!!  Anyhow, Tiddly Inks is having a blog hop.  You have to create a project/card using a Tiddly Inks digital image.  I have to be honest I only knew about Tiddly Inks images because of Donna Mundinger.  She got me hooked, so be sure to check her blog as well - she's extremely talented.
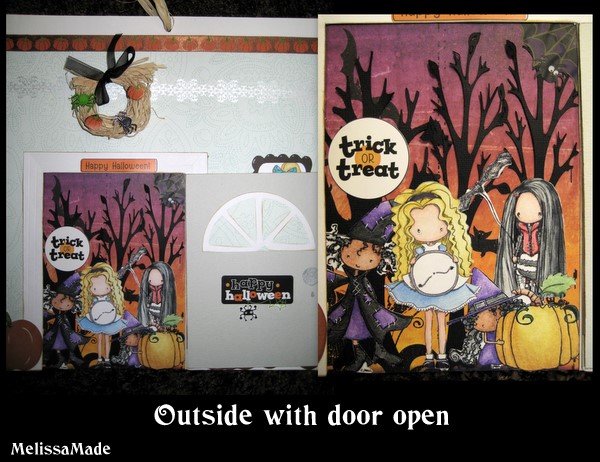
I had so much fun with this!  I wanted to use as many of their cute images as I could - in all 5!!!  You might be wondering how five!  Well take a look at this wall hanging I did for my girls for Halloween.  In the picture frame is cute little Annie - Annie's Prezzie
I used a number of cartridges and embellishments too!  Stretch Your Imagination for the trees, keyhole is from Gypsy Wanderings, the table is from Celebrations - it's actually a cake plate, and the frame is from Mini Monograms.  Oh, also the window on the front door is supposed to be a lemon slice from Just Because Cards.  The bowl is from My Kitchen.  Now you might ask yourself where the other images are???  Well the door bell is ringing - DING DONG
TRICK OR TREAT!!!!
The four images from left to right  are Higgelty, Alice in Time for Tea,  Bug - Peek A Boo Bugg and Batty.  All images were colored with Prisma colored pencils and blended using baby oil.  I started by making the inside of the house.  The door was made on George with just squares and rectangles.  I scored the door frame with my Martha Stewart score board.  Once I had the door in place on my top layer, I cut out the doorway and then placed my Tiddly Ink characters in position on the paper behind.  Once they were layered, I placed the inside on the top of the outside sheet and glued it down.  Lastly, I embellished and made the tiny wreath over the door with rafia and some cute spider buttons.  This project was so fun, and honestly it's part of why I haven't done anything else lately.  It's been on my mind since the blog hop info. was mentioned!!!  Make sure to head over to Tiddly Inks for the blog hop - the artistry from the people who are part of the hop will be amazing!!!  I hope you enjoy - I did!!!

Wednesday, July 21, 2010

Pumpkin Paper Tutorial

In honor of the upcoming Tiddly Inks Blog Hop I decided to make some paper for a background to a LO for Halloween.  I wanted to have just a simple pumpkin paper so I turned to my Gypsy.  This is for an 8x8 sheet of paper.  I took my ink spot "really rust" from Stampin' Up and a make-up sponge and inked up an 8x8 section of this spicy orange pumpkin paper from DCWV.  I wanted to add some depth to the paper and the ink hit that need.
 After I inked up the paper, I welded the border of pumpkins on Doodlecharms and simply aligned them in a row.  I staggered them so they would look a bit different for each row.  Next, I placed my cricut marker in my machine and attached my Gypsy to my Expressions.  I had my settings on 4 blade depth, 3 speed and 2 pressure - this works best for me, but you might want to try it yourself first to see what works best for you.  I then hit cut on my Gypsy. 
I only covered an 8x8 section of my 12x12 paper so finally I had to trim the edges. 

This is a simple way to make your own paper.  You could go much more elaborate and add more details to the images too!  I'm getting so excited for Halloween - it's a crafter's dream come true right?  - And, I bought Mini Monsters so it should be arriving at my door soon!  I think I'll give you a good review of the cartridge - let you know if it's worth purchasing - he he!
Enjoy!

Tuesday, July 20, 2010

Laugh Often - Jitterbuggin' Challenge Pastels

Hi everyone,
  I made this card for Sherri's Jitterbuggin' Challenge - use pastels, use a cricut sentiment, add at least one button and follow the sketch.  I just got this new paper from DCVW called the Linen Stack - I love it!  So I had to use it.  I needed something simple so this card is it.  I've been a bit out of it for crafting lately - block, too tired, unmotivated - not sure, but I know from speaking with many crafters that it happens.  My hubby and I have a beach vacation coming up and I think my mind is on that!!!  Anyhow, I used the couple from Sweethearts cartridge and I used the sentiment from Beyond Birthdays.  Something you should note, the Laugh Often from Beyond Birthdays didn't turn out so well.  I'm not sure if it's the way the cricut cuts this image or if the blocky letters just don't look that great.  But I touched it up a bit with some brown marker and now you can read it a bit better.  I welded the shadow for the bride and groom on my Gypsy and then cut the regular image out separately.  Then I pieced them together.  I added some buttons and called it done.  Quick and simple - just what my non crafting brain needed!!! 
Enjoy!

Friday, July 16, 2010

Please take a moment

Hey everyone - I just came from The Pink Stamper website run by Robyn.  If you get some time today, please stop by her blog and give her some love.  Also, take some time to hug those you love.  I know I will.

Wednesday, July 14, 2010

Matching It Up - Tiddly Ink Challenge #13

I had so much fun with my last Tiddly Inks Challenge that I decided to do another one.  I have to warn you all, these digital images are SO addicting and they are enabling me by giving me a gift voucher for the last challenge!!!    This challenge was to match the paper with the image.  I had so much fun coloring her - it was like I couldn't stop crafting once she was finished because I had to finish the card to put her on...she couldn't be without a home.  I was up until midnight last night crafting.  Now, it's 6:30am - yes, the baby got up early...LOL go figure.  Anyhow, this is pretty straight foward - used my prizma colored pencils to color her and used baby oil to do some blending.  I paper pieced the bottom of her dress.  Then I used my die cut, cuttlebug combo for the red stamp.  Everything else was just layered.  OH, I did cut out some flowers to put on the ribbon from the paper and computer generated the happy birthday!  Last I added some glossy accents to her shoes, to make them patent leather!!!
Enjoy!

Tuesday, July 13, 2010

Cool Yummy Treat - Challenge #18 at Fantabulous Cricut

This card looks so cute in real life and I have to be honest - it's not photographing well.  The glass part of the milkshake is cut from acetate.  I think that's part of my problem because it's a bit shiny.  On my Gypsy I welded a large oval from the cartridge From My Kitchen to the shadow milkshake from the same cart.  I also cut a smaller oval.  I cut the milkshake shadow twice in addition to the actual card cut.  I cut the milkshake twice as well, once out of acetate and once out of white cardstock.  I cut the cherry out of red.  I took the acetate piece and cut off the top so I could use just the glass part.  First, I ran it through the cuttlebug with the dots folder from Sizzix.  I grabbed my handy dandy dremel tool and roughed up the outside edges of the acetate ever so slightly.  I then grabbed some acrylic green and white paint and mixed them to get that perfect old coke bottle green color.  I brushed a light coat of paint on the back side of the acetate heavy around the edges and very lightly in the middle.  I then took a napkin and dabbed the center.  I wanted the white to show through a bit.  This made it look like an acutal glass for a sundae or milkshake.  Finally I layered my milkshake top with my Vintage Shabby paper from Tim Holtz.  I stickled the cherry stem and leaf with green stickles and used my glossy accents to cover the entire cherry.  I drew two red lines on my white straw (which I think was supposed to be a spoon) and then glossy accented that as well!  I added some little jewels to make sprinkles and a few more to the outside.  Finally, I found a little sticker from Creative Imaginations that said YUM!  Which sums up this cool YUMmy treat card for the Fantabulous Cricut Challenge!!! 
Enjoy!

Monday, July 12, 2010

Blog Awards!!!

Hi everyone,
  I received two blog awards from Peggy and Donna at Daily Grace Creations.  What a wonderful blog they have.  I recommend you go visit hers and all the other blogs that they have bestowed blog awards upon :o).  The rules to the receiving the awards are to pass them on to 10 other blogs that inspire creativity!  I know many of the blogs I visit often have these awards and I truly do feel honored to receive them.  So thank you so much Peggy and Donna.  Now, for my top 10 in no particular order:
Sliekje digi Stamp - she always has wonderful stamps that she does herself and then just gives them out to anyone
My Sheri Crafts - I love Sheri's blog.  She and her DT create and inspire while having fun at the same time.
Cricut Couple - They've just started their blog and their work is wonderful and inspiring!
A Lil' bit of me - Marlene is an artist hands down - her colored stamps - AMAZING, her photos -  SPECTACULAR
Sweet Pineapple Scrapping - Angji's blog is a new one I've just started following - but it's great b/c she's always doing something a bit different that's wonderful!
Popsicle Toes - Donna's blog is my top most visited blog.  Her work is DELICIOUS - I honestly love all her cards - she can go from sweet card to Burtonesque card in a heartbeat.  I'm sure she has already received these awards but she deserves them again!
Country Cabin Cards - Melissa has a great little blog and her cards are just too cute!
Beccy's Place - Another amazing artist that has some free stamps!!
Sharon Langford Designs - WOW her LO's - WOW - I think I love her :o)
MeeMees Creations - Another new blog I've joined and her stuff is just plain cute!

Thank you for all of the inspiration you've given me...I am blown away by your creativity and artistry!!  And a special thanks to Peggy and Donna for choosing my blog for such awards!

For those that I've given awards to - just save the images as jpeg's and put them on your blogs - don't forget to choose 10 of your favorite blogs!!!

Family - My Sheri Crafts Challenge #13

I was really excited to do a card about family and My Sheri Crafts provided the perfect inspiration.  My family is my life - my time spent with my sweet husband and sweet girls (ok, sometimes they are rotten!) is my best time spent.  I always try to tell my hubby that he is my favorite person in the world and I tell my girls that they are my favorite little people too!  So this card was a quick one for me.  I designed with my basic grey paper in mind, love this paper - and it just sort of fit the theme.  I used my Gypsy and welded the children going around a tree (Nursery Rhymes) to the word Family (Gypsy Wanderings).  I cut the images and inked the edges with Close to Cocoa from Stampin' Up.  I decided to go ahead and sort of distress the whole image to make it a little more antique.  I popped the entire image from the card.  I added a few family stickers from a sticker stack I found.  Very quick and easy but I think it turned out lovely.
Enjoy!

By the Sea - Jitterbuggin' Challenge

Challenge time again at Jitterbuggin' with Sherri.  The rules this time were as follows:  Follow the sketch, use red and yellow, and cut an item on the cricut that's from the beach.  I had a very hard time choosing my colors for this.  I finally turned to papers (Creative Memories Journaling Kit) that Sheila sent me from a challenge she had at She's A Sassy Lady - great blog by the way...always something new going on over there!  Once I found all these great colors and different patterns that were soft and fun at the same time I was set.  I used my Gypsy to set up this 6 x 6 card.  I used George for my squares and Create A Critter for all beach themed items.  I added a circle form George to the center of the starfish on my Gypsy so I could put a small ocean scene in the center.  I added some rhinestones and a Jolees swim bag, as well as the word SWIM from a set of stickers I picked up.
Enjoy!

Sunday, July 11, 2010

Tiddly Inks Challenge - Summer Fun with Water, Sand and Toys

Thought I would get a few cute digital images from Tiddly Inks.  Isn't she cute?  Tiddly Inks is also having a challenge - use a stamp that deals with summer fun.  My inspiration actually came from a ribbon I had.  Loved the blues in it and decided to match my paper and colored pencils to that flowered ribbon.  I only used one strip of it in the end which is hidden a bit but I think it's a good little pop of color.  I embossed my navy paper with Cuttlebug Swirls and then took a white marker and colored four of the waves.  I then took my exacto knife and cut along the waves so I could tuck my Tim Holtz Shabby paper corner behind the waves.  Once I colored my little stamp with my prizma colored pencils I used a Zig pen and added a bit of fine glitter to the sand.  I found the sentiment in a set of stickers I have but decided to computer generate the sentiment in a navy to match the papers.  Finally, I pieced it together and added a few pearls in mother of pearl and blue.  I hope you are having a sunny, sandy summer!
Enjoy!

Friday, July 9, 2010

Cards For Soldiers - Part 2

This is my second time participating in Cards For Soldiers.  The cards are sent to military units overseas.  Men and women in the military then have cards to send home to loved ones.  The people who run this are very dedicated to this cause and at their own expense ship these cards to the men and women serving our country.  A number of card makers are involved in making the cards and some make as many as a hundred or more!!  I try to make just 15 - and I get worn out!  I always get a warm fuzzy feeling when I do this - as I'm a helpless romantic I image a soldier sending a card filled with sweet nothings to a loved one - and to know that I made the card for him/her to write on makes me happy!  Anyhow, no instructions as they are pretty straight forward.   Thanks to our troops - and a special shout to Caleb Bagnall, my husbands brave brother serving in Iraq!  Our prayers and love go out to you!
Here's a pic of Uncle Caleb with his niece Auden
Enjoy!

Wednesday, July 7, 2010

Thinking of You

Decided to try my hand at the Cuttlebug Spot's Challenge this week after visiting Donna Mundinger's blog (be sure to check her page out - she's amazing).  She inspired me with her card to use my 2x2 cuttlebug folders.  I never use these for some reason, so I whipped them out and came up with this little card.  I used my American Crafts flower paper along with some DCVW solids.  Once I had the paper I had a little trouble deciding what to do next.  However, I have this sheer ribbon in just about every color imaginable.  So I tried something a little different.  I took the ribbons and cut about 1.5inch pieces.  Folded them in half and glued them this way with a tiny glue dot.  Next, I layered them under the flower paper in a little row.  Decided to add another row to make them look a bit fuller.  Added a few blue flower brads.  But it was missing something - so I cuttlebugged the coffee cup with the flower two more times and took my micro scissors and simply cut out the little flowers.  Inked the front of the card with my Stampin' Up blue ink (from the earth tones - can't remember the name) and was finished. 

Monday, July 5, 2010

Eat Play Sleep

Ok, so I spent some time working on a new card today for the Jitterbuggin' Challenge. I decided to rework this card actually using the stickers I had originally wanted to use. Also, choosing paper that I thought was more me. I made my own using a cream paper as well - this was fun. On Word I wrote eat play sleep and copied and repeated a number of times until I filled up a page. The margins were set at 0" all the way around. I then changed the font to one I liked - Bradley Hand ITC and changed the color to a light brown/orange. I used a background piece of paper from my Tim Holtz Ideology pad. I also used a paw print paper that I purchased years ago, sorry no name on it. The paper that has paw prints cut out - I did on my Gypsy - I used George and Basic Shapes - welded three ovals together and then put four ovals over the top. I also used the Gypsy to cut the kitty and pillow from Create a Critter. The words EAT. PLAY. SLEEP. and life is good is from a sticker set called Creative Imaginations and it's all epoxy kitty stickers! I should mention this is an A2 card. I popped the kitty and pillow out from the background piece that's also popped. In the end I added a shear cream ribbon to the edge.

Sunday, July 4, 2010

It's Your Day

Ever make a card and aren't too sure how you feel about it...well this one is it.  I am submitting it to Jitterbuggin' Challenge as part of a pet theme.  I love my kitty and wanted to send a card to my mom b/c she loves her kitty too.  This pic sort of looks like her Bailey Bob.  I just don't know, I'm not a huge orange fan - and well that's what I used.  I totally had something different in my mind - and it doesn't look like what I imagined at all!!!  I also used a set of stickers to choose the paper and then didn't even use the stickers!!  I think I've lost my card making mojo since going to my conference.  Anyhow, I'm posting it.  Hopefully, I'll be back on the horse soon!

Saturday, July 3, 2010

My Craft Area

I mentioned before that my sweet husband had made me a little craft area in our small condo.  Well I've been away on a business trip and once again my husband suprised me with an updated craft area!  He made an amazing shelf that has a number of hooks on it for my scissors, dust pan, embosser and glue gun.  He also put a basket for my cuddlebug/sizzix folders.  There is a ribbon holder and a set of four jars for embellishments.  To top it off there is a shelf for all my cartridges, YourStory, embosser and other things.  Now there is a shelf for all my containers and a place for my printer and printer paper.  I can't believe he did this while I was gone.  I was so greatful for my little area in the first place and he made it larger and more convienent.  He's amazing huh?? 
Enjoy!